Developer Guide
Table of Contents
- Table of Contents
- Introducing InternBuddy
- About the Developer Guide
- Setting Up and Getting Started
- Design
- Implementation
- Documentation, Logging, Testing, Configuration, Dev-ops
- Appendix A: Requirements
- Appendix B: Instructions for Manual Testing
- Appendix C: Planned Enhancements
- Appendix D: Effort
- Glossary
- Acknowledgements
Introducing InternBuddy
InternBuddy is a desktop application for Computing undergraduates to manage their internship applications. It is optimized for typing where it allows you to complete internship management tasks much more efficiently via the keyboard as compared to using traditional Graphical User Interface (GUI) applications. If you are a fast typist who is seeking a one-stop platform to systematically organise your internship applications, then InternBuddy is the perfect buddy to accompany you during your internship hunt.
InternBuddy runs using Java 11, and is available on the Windows, macOS and Linux operating systems.

About the Developer Guide
Objectives of the Developer Guide
This developer guide aims to provide developers with insights into the implementation of InternBuddy and to explain the design considerations behind its features. It utilises Unified Modeling Language (UML) diagrams created using PlantUML for a visual explanation of the implementation.
Apart from shedding light on InternBuddy’s internal details, this developer guide also provides information on how to conduct feature testing and showcases the user study component that we went through in the initial development phase for requirements gathering.
Hopefully, this developer guide will enable you to easily set up the InternBuddy project and extend its functionality if you are interested in doing so.
Using the Developer Guide
This developer guide uses a set of formatting standards and syntax to better communicate information.
Information Box
Tip Box
Warning Box
Syntax Highlighting
Commands, fields, file paths and class names are highlighted.
command, FIELD, filepath.json, ClassName
Keyboard Actions
Keyboard keys are indicated using rounded buttons.
Setting Up and Getting Started
Refer to the guide Setting up and getting started for instructions on how to set up the InternBuddy project in your personal computer. After launching InternBuddy, you would see a GUI. Figure 1 illustrates the main parts of InternBuddy’s GUI and Table 1 explains their functions. We will be referencing these different parts throughout this developer guide.
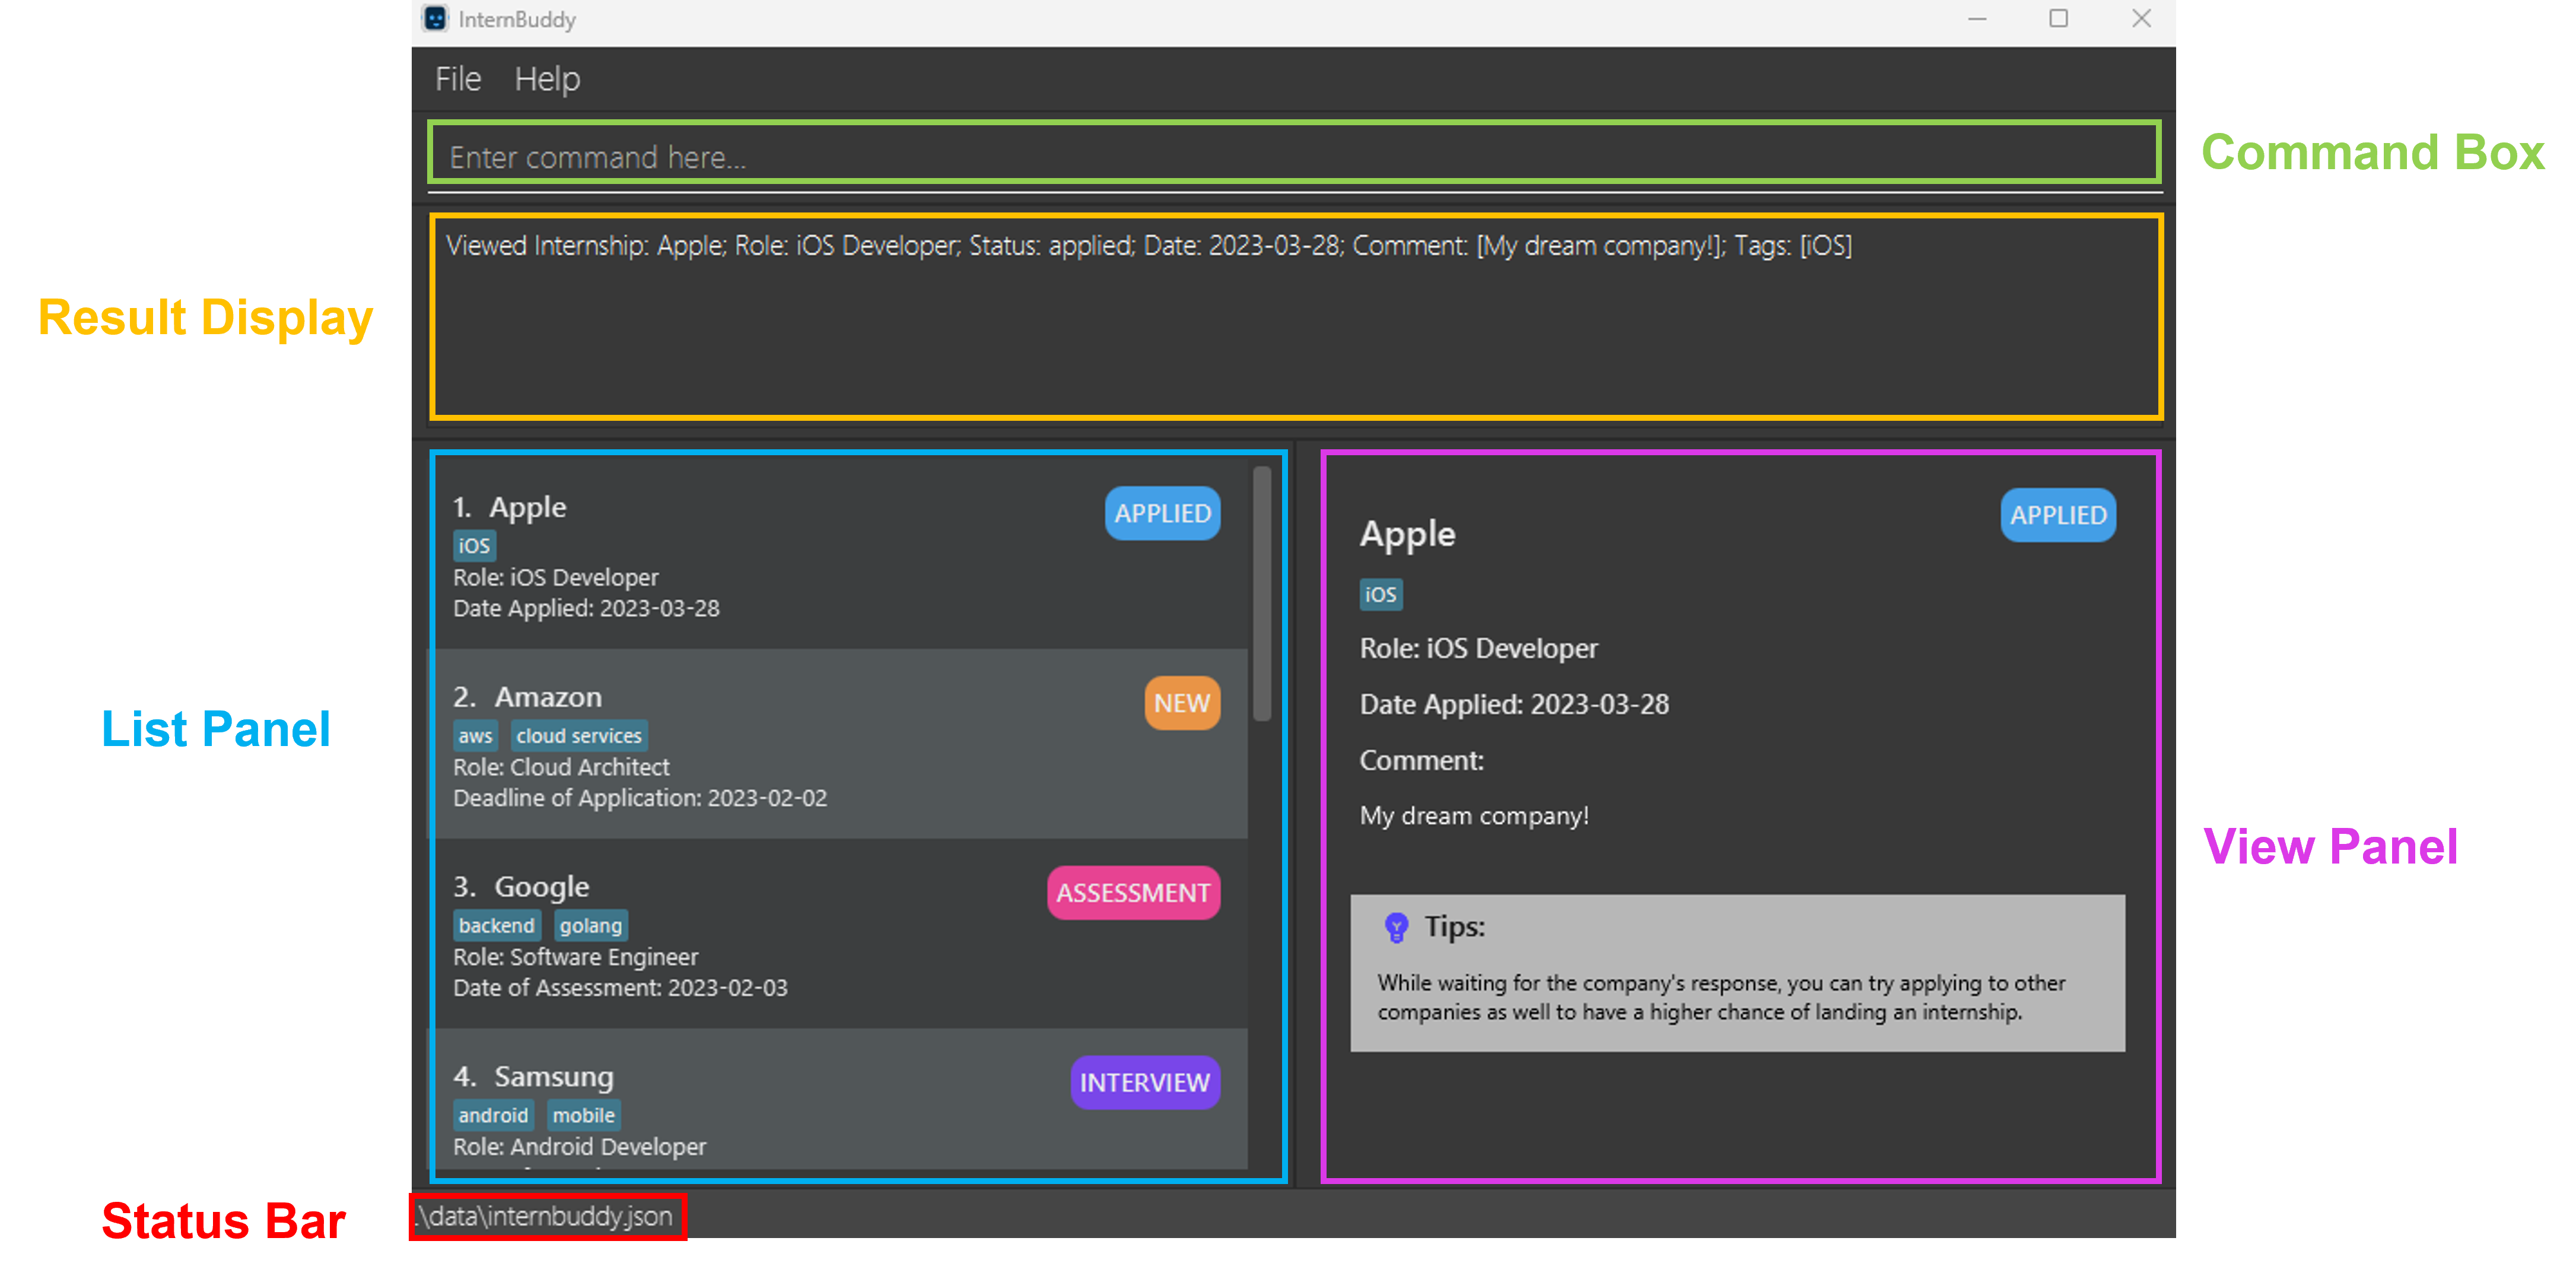
Figure 1: InternBuddy's GUI
| Part | Usage |
|---|---|
| Command Box | You can type in your commands here to interact with InternBuddy. |
| Result Display | This is where the results of your command will be displayed. |
| List Panel | Displays a list of internship entries. |
| View Panel | Displays either the welcome message or detailed information of a specified internship entry. |
| Status Bar | States where your InternBuddy data file is located on your computer. |
Table 1: Explanation of the different parts of InternBuddy's GUI
Design
.puml files used to create diagrams in this developer guide can be found in the diagrams folder. Refer to the PlantUML Tutorial at se-edu/guides to learn how to create and edit these diagrams.
Architecture
The Architecture Diagram shown in Figure 2 explains the high-level design of the App.

Figure 2: InternBuddy's architecture diagram
Given below is a quick overview of the main components and how they interact with each other.
Main components of the architecture
Main has two classes called Main and MainApp. It is responsible for,
- At app launch: Initializes the components in the correct sequence, and connects them up with each other.
- At shut down: Shuts down the components and invokes cleanup methods where necessary.
Commons represents a collection of classes used by multiple other components.
The rest of the App consists of four components.
-
UI: The UI (User Interface) of the App. -
Logic: The command executor. -
Model: Holds the data of the App in memory. -
Storage: Reads data from, and writes data to, the hard disk.
How the architecture components interact with each other
Figure 3 is a Sequence Diagram that shows how the components interact with each other for the scenario where the user
issues the command delete-index 1.

Figure 3: Sequence diagram that shows interactions between components
Each of the four main components (also shown in the Figure 3),
- defines its API in an
interfacewith the same name as the Component. - implements its functionality using a concrete
{Component Name}Managerclass (which follows the corresponding APIinterfacementioned in the previous point.
For example, the Logic component defines its API in the Logic.java interface and implements its
functionality using the LogicManager.java class which follows the Logic interface. Other components
interact with a given component through its interface rather than the concrete class
(reason: to prevent outside component’s being coupled to the implementation of a component),
as illustrated in the (partial) class diagram shown in Figure 4.

Figure 4: Partial class diagram for the logic, model and storage components
The sections below give more details of each component.
UI Component
The API of this component is specified in
Ui.java.
The class diagram for the UI component is shown in Figure 5.

Figure 5: Class diagram for the UI component
The UI consists of a MainWindow that is made up of parts e.g.CommandBox, ResultDisplay,
InternshipListPanel, StatusBarFooter etc. All these, including the MainWindow,
inherit from the abstract UiPart class which captures the commonalities between classes that
represent parts of the visible GUI.
The UI component uses the JavaFx UI framework. The layout of these UI parts are defined in matching
.fxml files that are in the src/main/resources/view folder. For example, the layout of the
MainWindow
is specified in MainWindow.fxml
The UI component,
- executes user commands using the
Logiccomponent. - listens for changes to
Modeldata so that the UI can be updated with the modified data. - keeps a reference to the
Logiccomponent, because theUIrelies on theLogicto execute commands. - depends on some classes in the
Modelcomponent, as it displaysInternshipobject residing in theModel.
Logic Component
API : Logic.java
Figure 6 illustrates a (partial) class diagram of the Logic component:

Figure 6: Partial class diagram for the logic component
How the Logic component works:
- When
Logicis called upon to execute a command, it uses theInternBuddyParserclass to parse the user command. - This results in a
Commandobject (more precisely, an object of one of its subclasses such asAddCommand) which is executed by theLogicManager. - The command can communicate with the
Modelwhen it is executed (e.g. to add an internship). - The result of the command execution is encapsulated as a
CommandResultobject which is returned back fromLogic.
Figure 7 below illustrates the interactions within the Logic component for the execute("delete-index 1 2") API call.
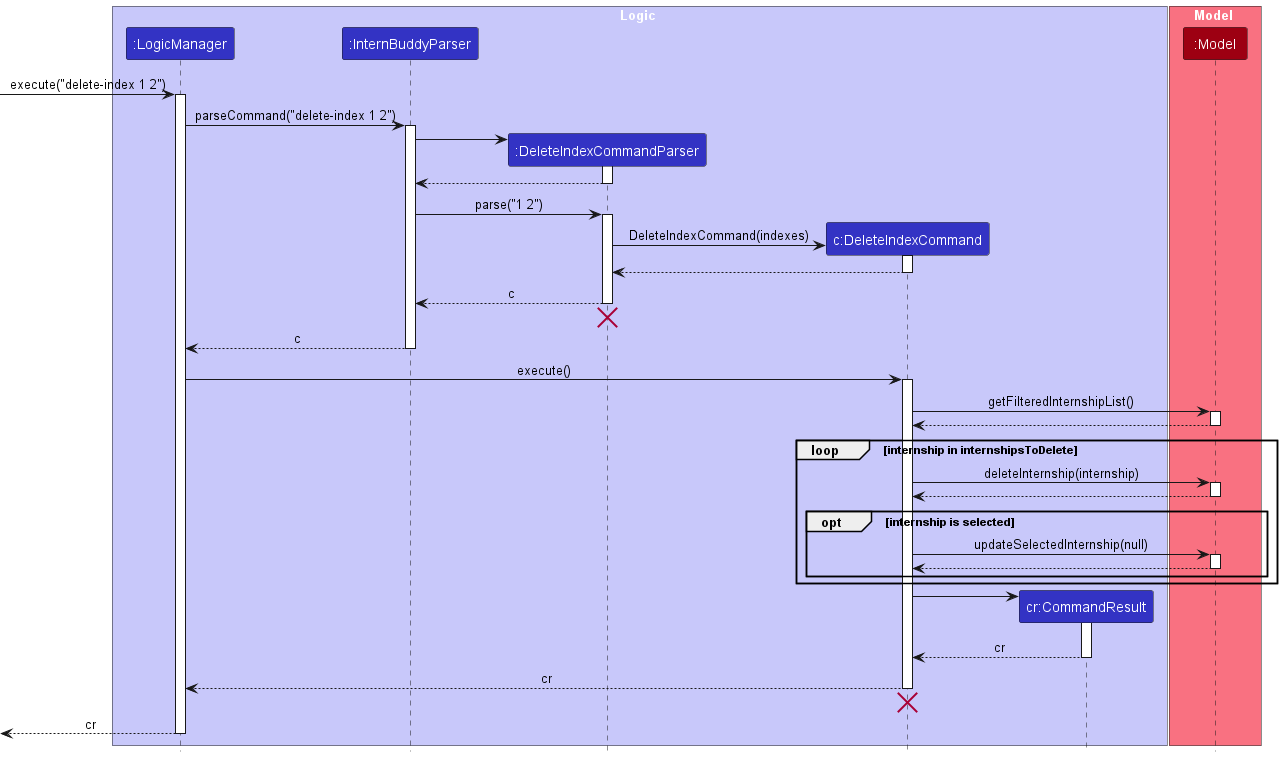
Figure 7: Sequence diagram for the delete-index command
DeleteIndexCommandParser and DeleteIndexCommand should end at the destroy marker (X) but due to a
limitation of PlantUML, the lifeline reaches the end of diagram.
Figure 8 shows the other classes in Logic (omitted from Figure 6) that are used for parsing a user command:

Figure 8: Class diagram for parser classes in the logic component
How the parsing works:
- When called upon to parse a user command, the
InternBuddyParserclass creates anXYZCommandParser(XYZis a placeholder for the specific command name e.g.,AddCommandParser) which uses the other classes shown above to parse the user command and create aXYZCommandobject (e.g.,AddCommand) which theInternBuddyParserreturns back as aCommandobject. - All
XYZCommandParserclasses (e.g.,AddCommandParser,FindCommandParser, …) inherit from theParserinterface so that they can be treated similarly where possible e.g, during testing.
Model Component
API : Model.java
Figure 9 is a class diagram for the Model component.

Figure 9: Class diagram for the model component
The Model component,
- stores the internsip data i.e., all
Internshipobjects (which are contained in aUniqueInternshipListobject). - stores the currently ‘selected’
Internshipobjects (e.g., results of a search query) as a separate filtered list which is exposed to outsiders as an unmodifiableObservableList<Internship>that can be ‘observed’ (e.g. the UI can be bound to this list so that the UI automatically updates when the data in the list change.). - stores a
UserPrefobject that represents the user’s preferences. This is exposed to the outside as aReadOnlyUserPrefobjects. - does not depend on any of the other three components (as the
Modelrepresents data entities of the domain, they should make sense on their own without depending on other components)
Tag list in the InternBuddy, which Internship references. This allows InternBuddy
to only require one Tag object per unique tag, instead of each Internship needing their own Tag objects.

Figure 10: Alternative model that is more OOP
Storage Component
API : Storage.java
Figure 11 is a class diagram for the Storage component.

Figure 11: Class diagram for the storage component
The Storage component,
- can save both internship data and user preference data in json format, and read them back into corresponding objects.
- inherits from both
InternBuddyStorageandUserPrefStorage, which means it can be treated as either one (if only the functionality of only one is needed). - depends on some classes in the
Modelcomponent (because theStoragecomponent’s job is to save/retrieve objects that belong to theModel)
Common Classes
Classes used by multiple components are in the seedu.internship.commons package.
Implementation
This section describes some noteworthy details on how certain features are implemented.
Add an Internship - add
Implementation
Figure 12 shows how the add command works.
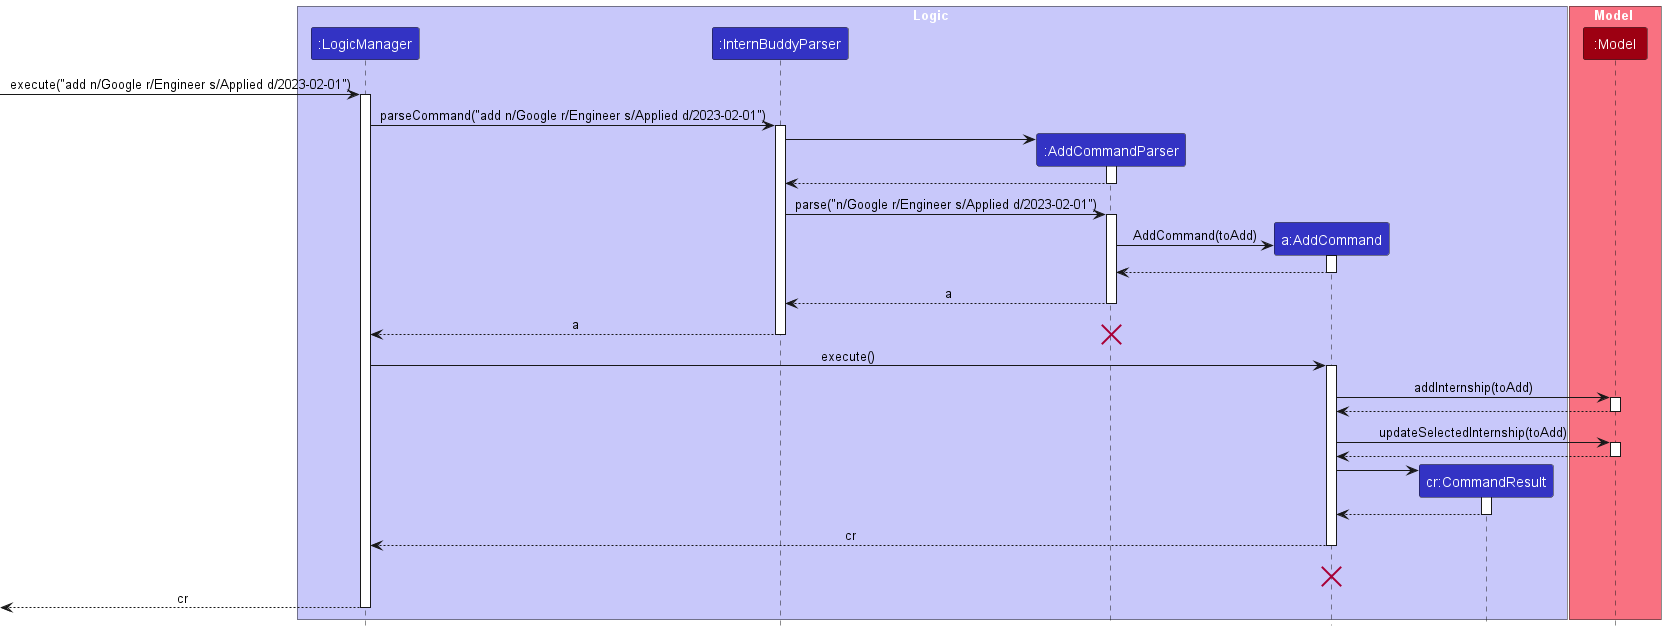
Figure 12: Sequence diagram for the add command
The following gives a more detailed explanation of the add command.
- When the user enters an
addcommand, theAddCommandParserparses the user’s input. - It checks for the following:
-
n/followed by the company’s name [Compulsory] -
r/followed by the role applied [Compulsory] -
s/followed by the status of the internship application [Compulsory] -
d/followed by the date associated with the entry [Compulsory] -
c/followed by the comment for the entry [Optional] -
t/followed by tags for the entry [Optional]
-
- If any of the compulsory fields is missing or any of the fields entered by the user
does not meet the field requirements, a
ParseExceptionwill be thrown. - An
Internshipwill be created from the parsed user’s input if Step 3 passes. - A check is done to see if the
Modelcomponent, which stores all theInternshipentries, contains theInternshipcreated in Step 4. - If a duplicate
Internshipis found, aCommandExceptionwill be thrown. - Else if there is no duplicate
Internship, theInternshipcreated will be added into theModelcomponent. - The currently selected
Internshipin theModelcomponent will be updated to become this newInternshipsuch that the View Panel displays the information for this newInternship.
Design Considerations
- Whether to make all fields in the
addcommand compulsory
-
Alternative 1 (chosen): Make only essential fields compulsory
- Pros: More user-centric as not all users want to enter the optional information, which is not exactly critical in tracking internships.
- Cons: More work needs to be done in code implementation. For example, the absence of optional
fields should not cause a
ParseException, and there is a need to include a default value ofNAfor input without anyComment.
-
Alternative 2: Make all fields compulsory
- Pros: Easier to implement as there is no need to differentiate between compulsory
and optional fields during command parsing, and it is easier to compare between
different
Internshipsince we just require an exact match of all fields. - Cons: Less user-centric where users who do not want to include
CommentandTagare forced to input something for theAddcommand to work.
- Pros: Easier to implement as there is no need to differentiate between compulsory
and optional fields during command parsing, and it is easier to compare between
different
- Whether to update the View Panel according to the
addcommand
-
Alternative 1 (chosen): Update the View Panel whenever a new
Internshipis added- Pros: Better visual indication that the
addcommand has been successfully executed. If the user has a lot ofInternshipentries, when a newInternshipis added, the new entry will be placed at the bottom of the List Panel, which is not visible if the user’s scroll position is at the top of the List Panel. Therefore, updating the View Panel enhances visual indication to the user that theInternshiphas been successfully added. - Cons: An additional line of code is required in the
executemethod ofAddCommandto update the selectedInternshipin theModelcomponent in order to update the View Panel.
- Pros: Better visual indication that the
-
Alternative 2: Do not update the View Panel when a new
Internshipis added- Pros: No additional code is required in the
executemethod ofAddCommand. - Cons: When the user has a lot of
Internshipentries, the added entry in the List Panel may not be visible since it is added to the bottom. Without scrolling, users have to rely on the Result Display to determine if theAddCommandis successful.
- Pros: No additional code is required in the
Edit an Internship - edit
Implementation
Figure 13 shows how the edit command works.
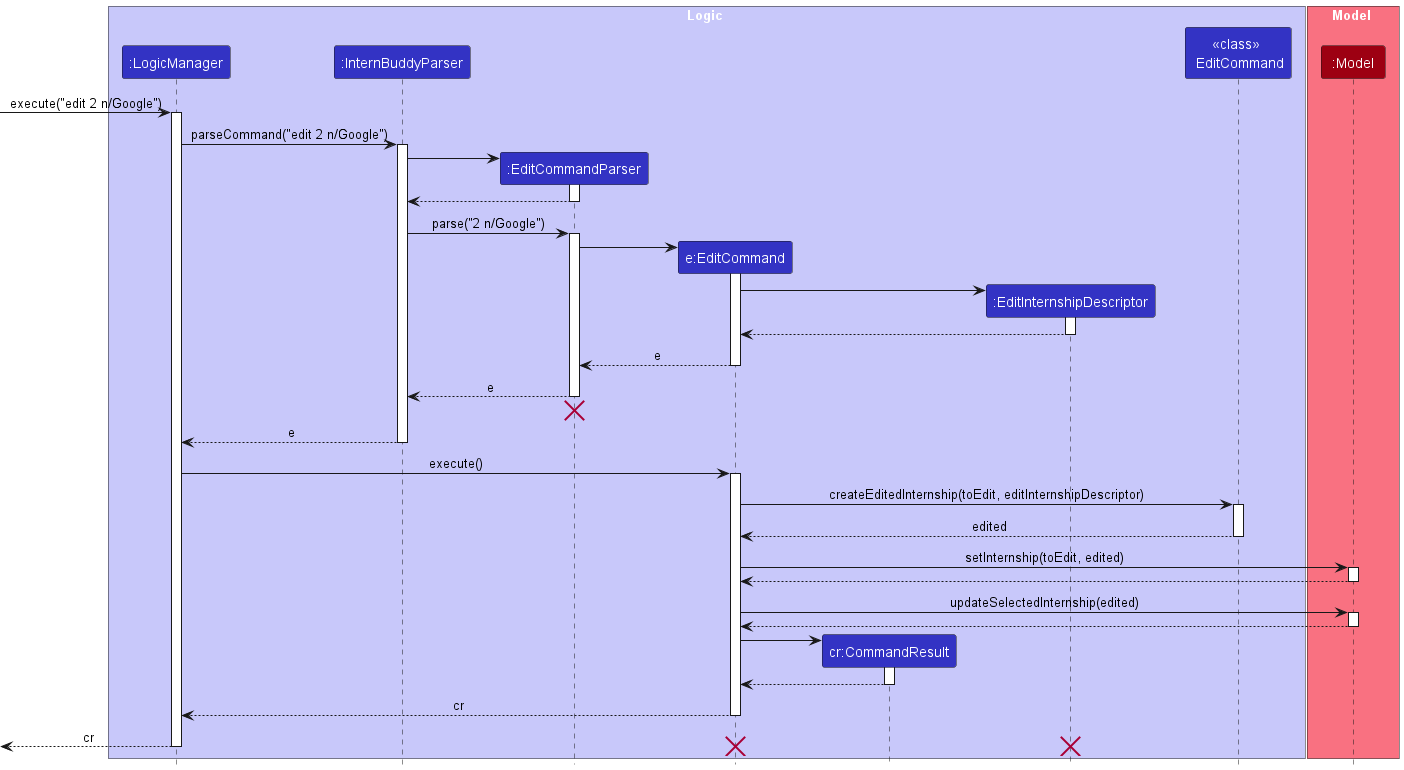
Figure 13: Sequence diagram for the edit command
The following gives a more detailed explanation of the edit command.
- When the user enters an
editcommand, theEditCommandParserparses the user’s input. - If the internship index specified is invalid, a
ParseExceptionwill be thrown and the specifiedInternshipwill not be edited. - If the company name, role, status, date, tag or comment fields are missing (at least one must be present) or invalid, a
ParseExceptionwill be thrown and the specifiedInternshipwill not be edited. - After the successful parsing of user input into
EditCommandParser, theEditCommandobject is created with a new updatedInternshipobject (to maintain immutability). - Following which,
EditCommand#execute(Model model)method is called which eventually calls theModel#setInternship(Internship toEdit, Internship edited)method, replacing the oldInternshipobject with the newly updated one.
Design considerations
- How
editexecutes
-
Alternative 1 (chosen): Edit command will create a new
Internshipto replace the existingInternshipobject.- Pros:
- Maintains immutability of
Internshipclass.
- Maintains immutability of
- Cons:
- May be less efficient than Alternative 2.
- Pros:
-
Alternative 2: Edit command will directly edit the
Internshipby modifying its attributes.- Pros:
- Will use less memory (no new
Internshipobject will be created). - Saves time since there is no need to create the new object.
- Will use less memory (no new
- Cons:
- Reduces the defensiveness of the code and the class.
- Pros:
View an Internship - view
Implementation
Figure 14 shows how the view command works.
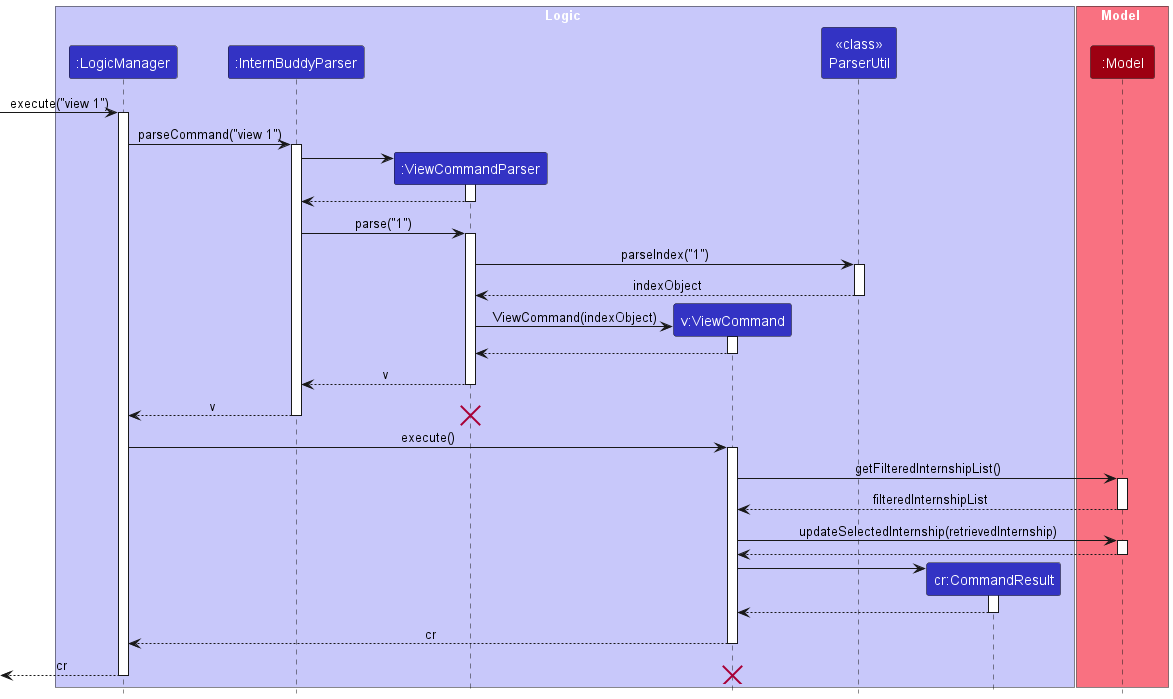
Figure 14: Sequence diagram for the view command
The following gives a more detailed explanation of the view command.
- When the user enters a
viewcommand, theViewCommandParserparses the user’s input. - It checks for the following:
- The
INDEXentered by the user must be able to be converted into a numeric index.
- The
- If the user entered a value of
INDEXthat cannot be converted, aParseExceptionwill be thrown. - An
Indexwill be created from the user’s input if Step 2 passes. - A check is done to see if the
Indexcreated in Step 4 is a valid index given the number ofInternshipentries in the filteredInternshiplist of theModelcomponent. - If the
Indexis invalid, aCommandExceptionwill be thrown. - Else if the
Indexis valid, theInternshipwhich belongs to thatIndexwill be retrieved by accessing the filteredInternshiplist. - The currently selected
Internshipin theModelcomponent will be updated to become theInternshipobtained from Step 7 such that the View Panel displays the information for this selectedInternship.
Design Considerations
- Whether to separate the checking of valid user input into 2 classes
-
Alternative 1: Allow
ViewCommandto handle the checking of whether user input can be parsed into an index, and whether it is a valid index- Pros: No need for a separate
ViewCommandParserclass and any problems with checking of user input can be isolated to theViewCommandclass. - Cons: Breaks the abstraction where parsing of user input should be done by a
Parserclass instead of aCommandclass.
- Pros: No need for a separate
-
Alternative 2 (chosen): Allow
ViewCommandParserto handle checking of whether user input can be parsed into an index, andViewCommandto handle checking of whether it is a valid index- Pros: Maintains the abstraction between the
ParserandCommandclasses. Also, it makes it more maintainable for future extensions in the event that further checks to the user input are required. - Cons: Have to maintain code in 2 separate classes and in the event that there
is an issue in processing user input for the
ViewCommand, there is a need to identify and isolate which of the 2 checks does the problem originate from.
- Pros: Maintains the abstraction between the
Copy an Internship to Clipboard - copy
Implementation
Figure 15 shows how the copy command works.
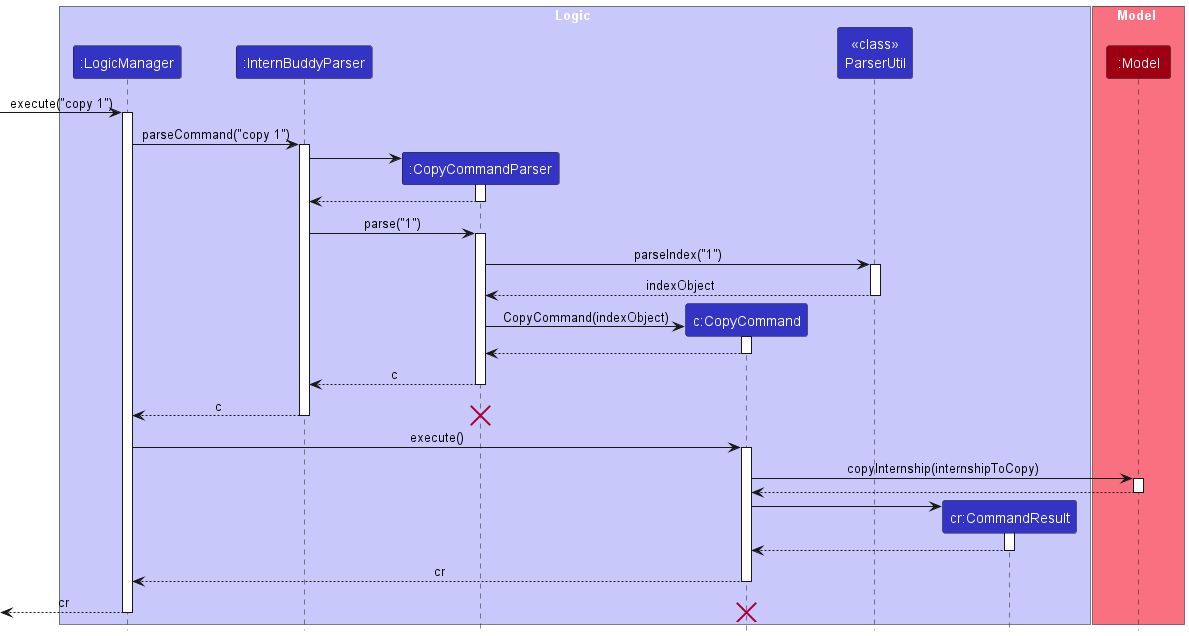
Figure 15: Sequence diagram for the copy command
The following gives a more detailed explanation of the copy command.
- When the user enters a
copycommand, theCopyCommandParserparses the user’s input. - It checks for the following:
- The
INDEXentered by the user must be able to be converted into a numeric index.
- The
- If the user entered a value of
INDEXthat cannot be converted, aParseExceptionwill be thrown. - An
Indexwill be created from the user’s input if Step 2 passes. - A check is done to see if the
Indexcreated in Step 4 is a valid index given the number ofInternshipentries in the filteredInternshiplist of theModelcomponent. - If the
Indexis invalid, aCommandExceptionwill be thrown. - Else if the
Indexis valid, theInternshipwhich belongs to thatIndexwill be retrieved by accessing the filteredInternshiplist. - Following which,
CopyCommand#execute(Model model)method is called which eventually calls theModel#copyInternship(Internship target)method. This copies thetoString()representation of theInternshipobject onto the clipboard.
Design Considerations
- How to run the clipboard operation
-
Alternative 1: Run the clipboard code directly.
- Will work if the testing framework is already running on the event dispatch thread (such as JUnit Swing or FEST-Swing). However, this is not the case for this project.
-
Alternative 2: (chosen): Use the
SwingUtilities.invokeLater()method to wrap the clipboard code in a Runnable object- Ensures that the clipboard operation is safe to run from a test or a non-GUI context.
Find Internships - find
Implementation
Figure 16 shows how the find command works.
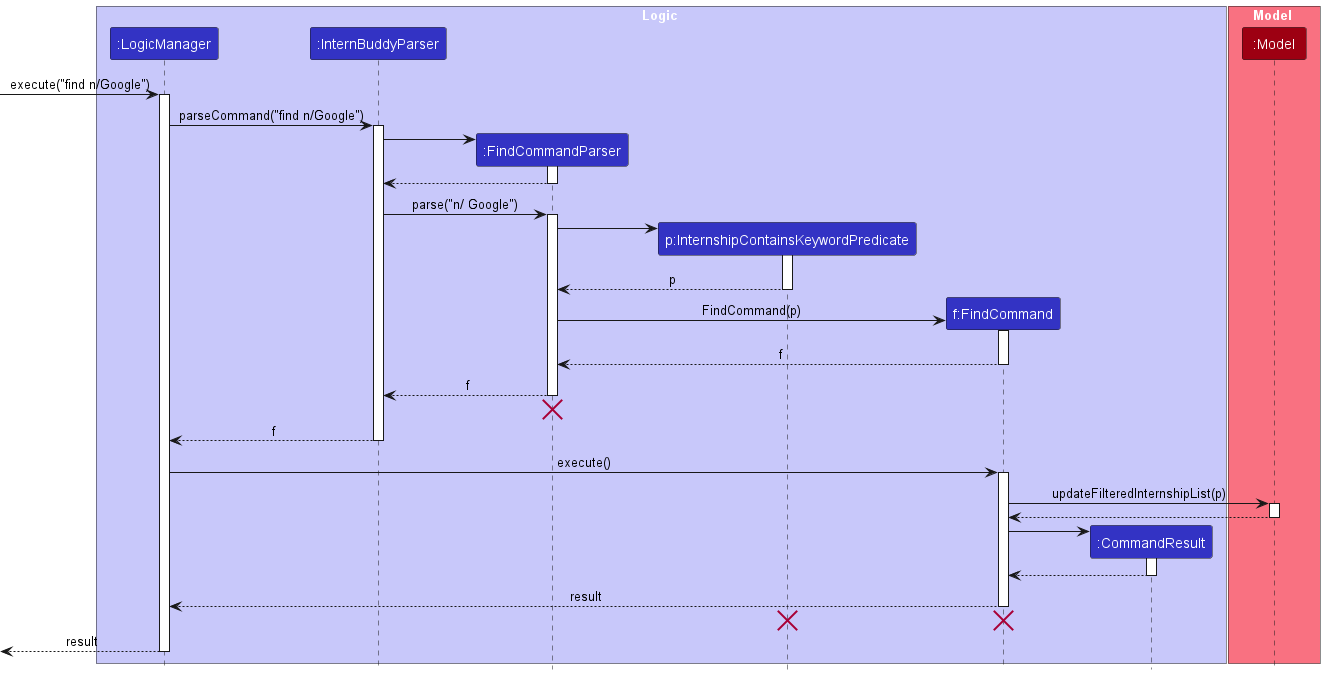
Figure 16: Sequence diagram for the find command
The following gives a more detailed explanation of the find command.
- If the name, role, status, date and tag fields are all missing or one of their values are invalid, a
ParseExceptionwill be thrown and theFindCommandwill not be executed. - After the successful parsing of user input into
FindCommandParser, anInternshipContainsKeywordPredicateobject, containing the lists of keywords specified in the user input, is created, which in turn is used to create aFindCommandobject. - Following which, the
FindCommand#execute(Model model)method is called which eventually calls theupdateFilteredInternshipList(Predicate<Internship> predicate)method with theInternshipContainsKeywordPredicateobject, previously created byFindCommandParser, as its argument and updates theFilteredList<Internship>stored inside theModel.
Design Considerations
- How
findcommand uses user input
-
Alternative 1 (chosen): Find an internship by exact match of user input and the
Internshipobject’s corresponding attributes.- Pros:
- Instructions on how to use the find command will be clear and easily communicated to user.
- Cons:
- Restrictive for the user (e.g. An internship with the company name
Google Ltdwill not turn up for the commandfind n/Google).
- Restrictive for the user (e.g. An internship with the company name
- Pros:
-
Alternative 2: Find an internship by match of user input and the substrings in the
Internshipobject’s attributes.- Pros:
- Command is much more flexible (e.g. An internship with the company name
Googlewill turn up for the find commandfind n/goo).
- Command is much more flexible (e.g. An internship with the company name
- Cons:
- May be confusing for the user (e.g. The user assumes that the
findcommand works for matching substrings of individual words. He inputsfind n/goo incfor anInternshipwith company nameGoogle Incorporated).
- May be confusing for the user (e.g. The user assumes that the
- Pros:
-
Alternative 3: Find an internship by match of any word of user input and any word of the
Internshipobject’s corresponding attributes.- Pros:
- Command is much more flexible.
- Cons:
- Command becomes too flexible (e.g. A
findcommand likefind n/google ltdwill returnInternshipobjects that have either the wordgoogleorltdin their company names. Internships with company names such asApple ltdandMeta Ltdwill be returned.
- Command becomes too flexible (e.g. A
- Pros:
Get Upcoming Events and Deadlines - upcoming
Implementation
Figure 17 shows how the upcoming command works.
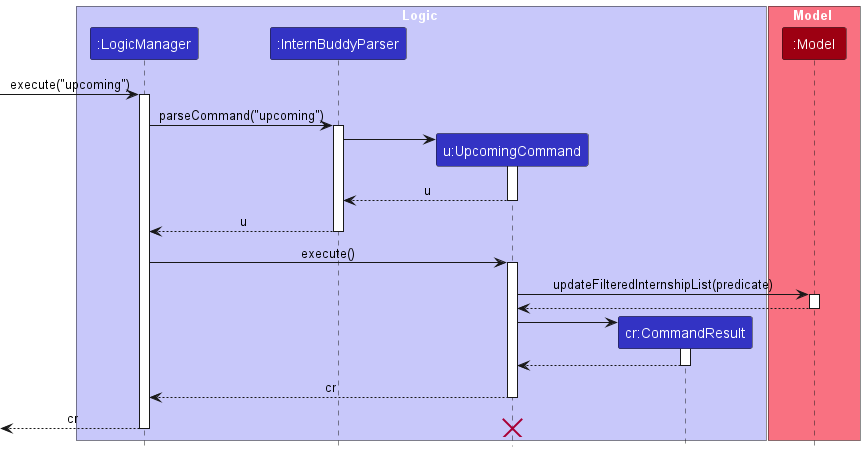
Figure 17: Sequence diagram for the upcoming command
The following gives a more detailed explanation of the upcoming command.
- When the user enters an
upcomingcommand, anUpcomingCommandobject is created. - Following which,
FilteredList<Internship>stored inside the model will be updated by checking each internship entry against a predicate. - The predicate checks whether both of the following conditions are met:
- The
STATUSof the internship must be one of the following:NEWASSESSMENTINTERVIEWOFFERED
- The
DATEmust be within the upcoming week.
- The
Design Considerations
- Whether to include all possible statuses of an internship
-
Alternative 1 (chosen): The predicate for the
upcomingcommand should be limited to internships that have the statusNEW/ASSESSMENT/INTERVIEW/OFFERED.- Pros: Makes more practical sense as these statuses have dates that are tied to an event or deadline:
-
NEW- Deadline of Application -
ASSESSMENT- Date of Assessment -
INTERVIEW- Date of Interview -
Offered- Deadline of Offer Acceptance
-
- Cons: If the instructions for using the command are not clearly explained in the user guide, users may have difficulty understanding the output that is generated.
- Pros: Makes more practical sense as these statuses have dates that are tied to an event or deadline:
-
Alternative 2: Internships with any status would be accepted, even with statuses that are not tied to an upcoming event or deadline.
- Pros: May be more intuitive for users to understand.
- Cons: This may cause users to forget the intended use case of the command, leading to confusion or misuse.
Delete Internship Entries by Fields - delete-field
Implementation
Figure 18 shows how the delete-field command works.
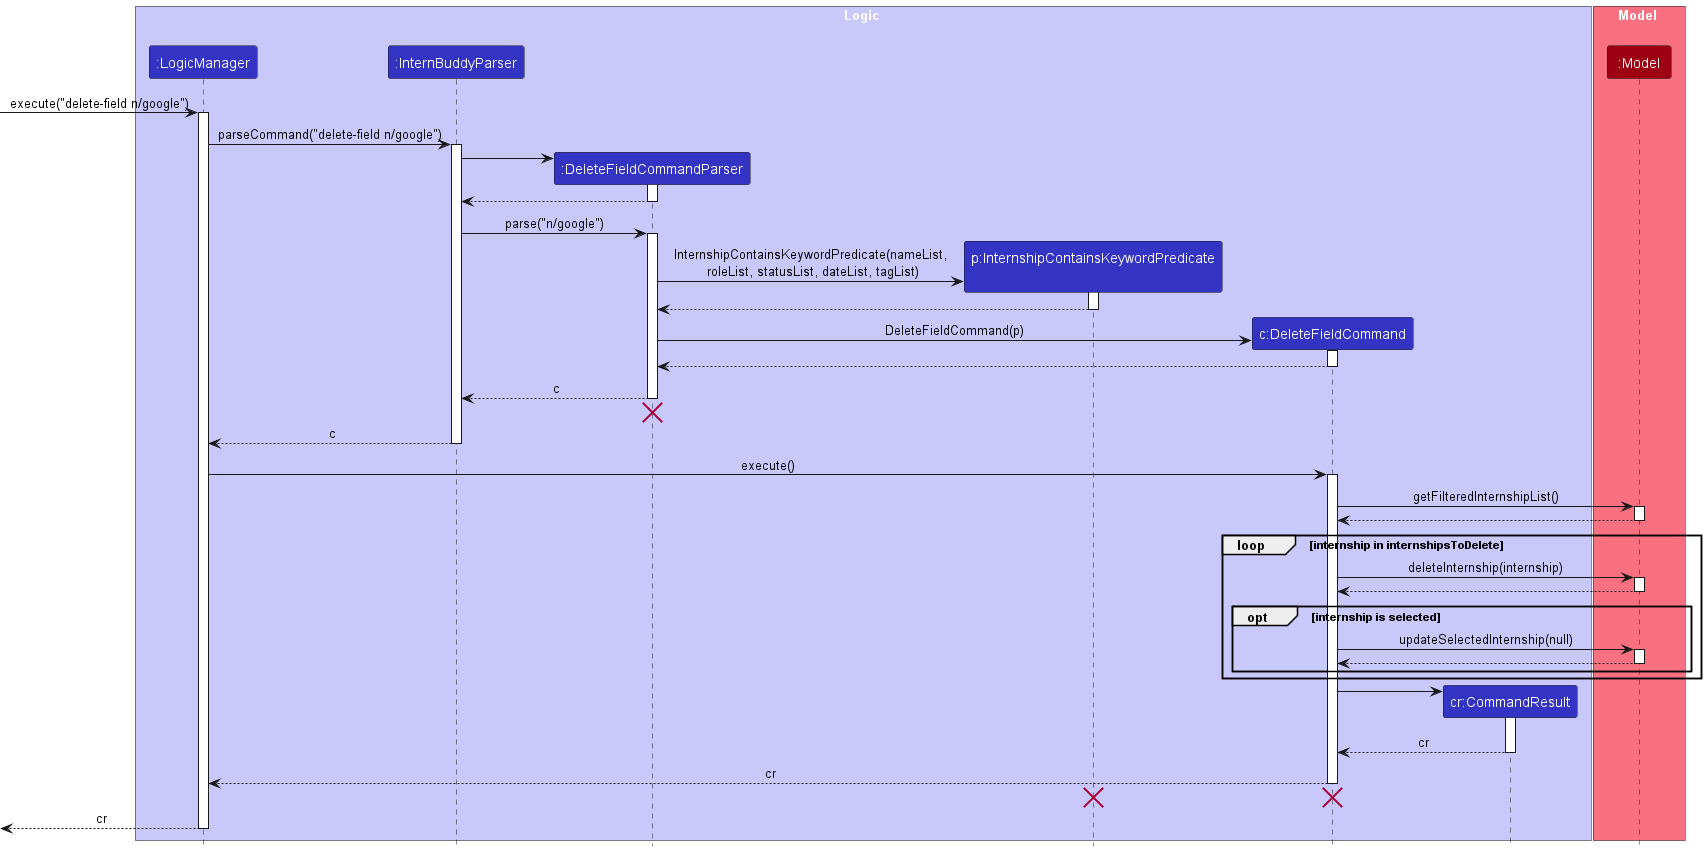
Figure 18: Sequence diagram for the delete-field command
The following gives a more detailed explanation of the delete-field command.
- When the user enters a
delete-fieldcommand, theDeleteFieldCommandParserparses the user’s input. It attempts to parse the arguments as a set of prefixed fields ([n/COMPANY_NAME] [r/ROLE] [s/STATUS] [d/DATE] [t/TAG]). - A new
InternshipContainsKeywordPredicateobject is created. ADeleteFieldCommandobject is then created. - When the
DeleteFieldCommandobject executes, a list ofInternshipobjects is obtained withmodel.getFilteredInternshipList(). - For each
Internshipobject in the list that matches with at least one value for every field type that is specified, it will be deleted usingmodel.deleteInternship(internshipToDelete)
Design Considerations
-
Whether to use an AND relationship or an OR relationship between different fields
- For example, should
delete-field n\Google r\Software Engineerdelete internships that have company name of Google AND role as Software Engineer, or delete internships that have company name of Google OR role of Software Engineer?
- For example, should
-
Alternative 1 (chosen): Use an AND relationship
- Pros: More user-centric as users will be able to have more fine-grained control over what internships they want to delete. For example, they may want to delete all internship entries related to a certain company AND role.
- Cons: If users want to delete internships based on an OR relationships, they need to call
delete-fieldmultiple times.
-
Alternative 2: Use an OR relationship
- Pros: Much easier for the user to reason about which internships will be deleted.
- Cons: Less fine-grained control over
delete. For example, there is no way to delete internships that have company name of Google AND role of Software Engineer
-
Whether to add this enhancement to the
clearordeletecommand, or to create a new command entirely
-
Alternative 1 (chosen): Split the
deletecommand intodelete-indexanddelete-field.delete-indexwill delete only indices, whiledelete-fieldwill only delete by fields.- Pros: Both commands now share the same prefix
delete, so it is easier to remember. - Cons: Delete now has 2 formats, and this may be a source of confusion.
- Pros: Both commands now share the same prefix
-
Alternative 2: Enhance the
deletecommand only. For example,delete 1 2 n/Googlewill delete any of the first 2 entries if they have a company name ofGoogle.- Pros: Combining all delete features into one command makes it easier to remember.
- Cons:
- Very difficult to justify usage. It is unlikely for a user to require such absolute fine-grained control. A more likely use case is to mass delete internships that are no longer required.
- Difficult to define a suitable interpretation of the fields. For example, in the command
delete 1 2 n/Google, the command should delete internships with (Index 1 OR 2) AND have a company nameGoogle. Maintaining both AND and OR relationships can be confusing for the user.
-
Alternative 3: Enhance the
clearcommand.- Pros: The current
clearcommand takes in no arguments, so it is much easier to implement. - Cons: May be confusing to the user, since there will be no clear distinction between
deleteandclear.
- Pros: The current
Documentation, Logging, Testing, Configuration, Dev-ops
Appendix A: Requirements
Product Scope
Target user profile: Computing Undergraduates
Characteristics of user profile:
- Has a need to manage many internship applications
Internships form an integral part of the undergraduate curriculum for Computing Undergraduates. In a technical field like Computing, it is especially important for undergraduates to practice what they have learnt in classrooms. However, given the tight competition in the market, many undergraduates source for numerous internship opportunities before being accepted for one. Therefore, many Computing undergraduates face the need to track many applications where each could be in a different phase of the application process.
- Prefers typing to mouse interactions, with good typing speed
Computing undergraduates have great exposure to computer usage where coding assignments and projects in school require extensive typing. This justifies a sufficiently good level of proficiency with regard to typing. In fact, with the existence of keyboard shortcuts, many programmers prefer typing over using the mouse because of the efficiency gains.
- Reasonably comfortable in using Command Line Interface (CLI) apps
CLI provides a simple way to interact with computers to run programs and manage files. Computing undergraduates are taught how to use the CLI in their curriculums, and are often required to use it to run system tasks that cannot be done over the GUI. Hence, this would imply a reasonable level of comfort in using the CLI interface.
- Prefers desktop applications over other types
Value proposition:
InternBuddy aims to provide a 1-stop platform for a computing undergraduate to view and manage his internship applications. Consolidating internship information, the application provides organisational capabilities for easy tracking and follow-ups while eliminating the need to handle data across multiple platforms.
User Stories
Table 2 documents the user stories for InternBuddy.
Priorities: High (must have) - * * *, Medium (nice to have) - * *, Low (unlikely to have) - *
| Priority | As a … | I want to … | So that I can… |
|---|---|---|---|
* * * |
Computing undergraduate with many internship applications | list out all the entries | browse through my list of applications. |
* * * |
Computing undergraduate applying for many internships | add a new entry | manage new applications using InternBuddy. |
* * * |
Computing undergraduate managing many concurrent internship applications | add a status to each entry | track the status of each application. |
* * * |
Computing undergraduate who is planning to track internship applications in the long run | delete entries | remove outdated or irrelevant entries from InternBuddy. |
* * * |
Computing undergraduate who is planning to track internship applications in the long run | store data | resume from where I left off in my previous run of InternBuddy. |
* * * |
Computing undergraduate who is a new user of InternBuddy | view the list of supported commands | refer to it when I am unsure about the usage of InternBuddy. |
* * |
meticulous Computing undergraduate | be notified that InternBuddy is exiting | be rest assured that InternBuddy has successfully terminated when I exit it. |
* * |
careless Computing undergraduate | modify the details of an entry | correct my typos without having to create a new entry from scratch. |
* * |
careless Computing undergraduate | be prompted with a confirmation message before I delete an entry | avoid accidental deletes. |
* * |
forgetful Computing undergraduate | rely on auto-saving of data | avoid the problem of forgetting to save my entries when I make changes to them. |
* * |
Computing undergraduate applying for technical roles | tag each entry with its associated tech stack | identify the technical requirements associated with each application. |
* * |
Computing undergraduate applying for technical roles | filter internship entries by tags | narrow down the search to internship applications with the tech stack that I would like to work on. |
* * |
Computing undergraduate managing many concurrent internship applications | filter internship entries by date | identify the upcoming tasks or deadlines. |
* * |
Computing undergraduate with many internship applications | search an entry by name | easily and swiftly locate the desired entry. |
* * |
Computing undergraduate who is not extremely proficient with the command line interface | have intuitive and simple-to-pick-up commands | use InternBuddy without much technical difficulties. |
* * |
detail-oriented Computing undergraduate | add custom remarks to each entry | have the flexibility of documenting miscellaneous but relevant information. |
* * |
Computing undergraduate managing many concurrent internship applications | obtain reminders | avoid forgetting about upcoming tasks or deadlines. |
* * |
Computing undergraduate using multiple devices | export my internship data into a file | view the same data when I am not using the device with InternBuddy installed. |
* * |
Computing undergraduate who wants to share my internship details with others | copy the details of an internship | send the details to other people. |
* |
Computing undergraduate who is slow in learning | go through a step-by-step in-app tutorial | learn how to use InternBuddy in a guided and self-paced environment. |
* |
analytical Computing undergraduate | have a summary overview of all the entries | analyse the composition of the entries, such as what percentage of applications were successful. |
* |
Computing undergraduate who is new to internships | receive tips | use the tips to improve my experience during the internship application process. |
* |
Computing undergraduate who is planning to track internship applications in the long run | archive old entries | delete them from InternBuddy while maintaining a backup copy of the outdated data. |
* |
Computing undergraduate who is experienced in using InternBuddy | have shortcuts to existing commands | carry out tasks in InternBuddy even more efficiently than previously. |
Table 2: List of user stories
Use Cases
(For all use cases below, the System is InternBuddy and the Actor is the user, unless specified otherwise)
Use case: List all internships
Main Success Scenario
- User requests for the list of all internship applications in InternBuddy.
-
InternBuddy displays a list of all the internship entries.
Use case ends.
Use case: Add an internship
Main Success Scenario
- User enters internship entry.
-
InternBuddy adds an internship entry, updates the View Panel, and displays a success message.
Use case ends.
Extensions
- 1a. InternBuddy detects that one or more compulsory fields are missing.
-
1a1. InternBuddy prompts the user for an
addcommand of the correct format.Use case resumes from Step 1.
-
- 1b. InternBuddy detects one or more fields are invalid.
-
1b1. InternBuddy prompts the user for an
addcommand of the correct format.Use case resumes from Step 1.
-
Use Case: Edit an internship
Main Success Story
- User edits an internship entry.
-
InternBuddy updates that particular internship entry, updates the View Panel, and displays a success message.
Use case ends.
Extensions
- 1a. InternBuddy detects that no fields are provided.
-
1a1. InternBuddy prompts the user for an
editcommand of the correct format.Use case resumes from Step 1.
-
- 1b. InternBuddy detects one or more fields are invalid.
-
1b1. InternBuddy prompts the user for an
editcommand of the correct format.Use case resumes from Step 1.
-
Use Case: View an internship
Main Success Scenario
- User views an internship entry.
-
InternBuddy updates the View Panel with the details of the internship that is being viewed, and displays a success message.
Use case ends.
Extensions
- 1a. InternBuddy detects that the required internship index is missing.
-
1a1. InternBuddy prompts the user for an
viewcommand of the correct format.Use case resumes from Step 1.
-
- 1b. InternBuddy detects that the internship index entered is invalid.
-
1b1. InternBuddy prompts the user for a
viewcommand of the correct format.Use case resumes from Step 1.
-
- 1c. InternBuddy detects that the index is out of range.
-
1c1. InternBuddy informs the user that the index is out of range.
Use case resumes from Step 1.
-
Use Case: Copy an internship to clipboard
Main Success Scenario
- User copies an internship entry to clipboard.
-
InternBuddy displays a success message.
Use case ends.
Extensions
- 1a. InternBuddy detects that the required internship index is missing.
-
1a1. InternBuddy prompts the user for a
copycommand of the correct format.Use case resumes from Step 1.
-
- 1b. InternBuddy detects that the internship index entered is invalid.
-
1b1. InternBuddy prompts the user for a
viewcommand of the correct format.Use case resumes from Step 1.
-
- 1c. InternBuddy detects that the index is out of range.
-
1c1. InternBuddy informs the user that the index is out of range.
Use case resumes from Step 1.
-
Use Case: Find internships
Main Success Scenario
- User finds internship entries based on the fields given.
-
InternBuddy lists the internships that match the given fields and displays a success message indicating how many internships were found.
Use case ends.
Extensions
- 1a. InternBuddy detects that no fields are provided.
-
1a1. InternBuddy prompts the user for a
findcommand of the correct format.Use case resumes from Step 1.
-
- 1b. InternBuddy detects that one or more fields given are invalid.
-
1b1. InternBuddy prompts the user for a
findcommand of the correct format.Use case resumes from Step 1.
-
Use Case: Get internships with upcoming events or deadlines
Main Success Scenario
- User requests for internship entries with upcoming events or deadlines.
-
InternBuddy displays a list of internship entries with events or deadlines within the week.
Use case ends.
Use Case: Delete internships by indices
Main Success Scenario
- User deletes internship entries based on specified indices.
-
InternBuddy displays a success message that indicates how many internships were deleted.
Use case ends.
Extensions
- 1a. InternBuddy detects that no index is given.
-
1a1. InternBuddy prompts the user for a
delete-indexcommand of the correct format.Use case resumes from Step 1.
-
- 1b. InternBuddy detects that one or more fields given are invalid.
-
1b1. InternBuddy prompts the user for a
delete-indexcommand of the correct format.Use case resumes from Step 1.
-
- 1c. InternBuddy detects that one or more of the given indices are out of range.
-
1c1. InternBuddy informs the user that the index is out of range.
Use case resumes from Step 1.
-
- 2a. InternBuddy detects that the internship whose details are currently displayed in the
View Panel has been deleted by this
delete-indexcommand.-
2a1. InternBuddy resets the View Panel to display the welcome message.
Use case resumes from Step 2.
-
Use Case: Delete internships by fields
Main Success Scenario
- User deletes internship entries based on specified fields.
-
InternBuddy displays a success message that indicates how many internships were deleted.
Use case ends.
Extensions
- 1a. InternBuddy detects that no field is given.
-
1a1. InternBuddy prompts the user for a
delete-fieldcommand of the correct format.Use case resumes from Step 1.
-
- 1b. InternBuddy detects that one or more fields given are invalid.
-
1b1. InternBuddy prompts the user for a
delete-fieldcommand of the correct format.Use case resumes from Step 1.
-
- 2a. InternBuddy detects that the internship whose details are currently displayed in the
View Panel has been deleted by this
delete-fieldcommand.-
2a1. InternBuddy resets the View Panel to display the welcome message.
Use case resumes from Step 2.
-
Use Case: Clear all internships
Main Success Scenario
- User requests to clear all internship entries stored in InternBuddy.
-
InternBuddy deletes all internship entries. It resets the View Panel to display the welcome message and shows a success message.
Use case ends.
Use Case: Get Help
Main Success Scenario
- User requests for help in using InternBuddy.
-
InternBuddy opens up a new window that displays the list of commands supported by InternBuddy and provides the link to InternBuddy’s user guide.
Use case ends.
Use case: Exit InternBuddy
Main Success Scenario
- User requests to exit InternBuddy.
-
InternBuddy closes.
Use case ends.
Non-Functional Requirements
- InternBuddy should work on any mainstream operating systems as long as it has Java
11or above installed. - InternBuddy should be able to hold up to 500 internship entries without a noticeable sluggishness in performance for typical usage.
- InternBuddy should be able to respond to user input within 6 seconds.
- A Computing undergraduate with above average typing speed for regular English text (i.e. not code, not system admin commands) should be able to accomplish most of the tasks faster using commands than using the mouse.
- Computing undergraduates who have never used command line applications to track internships before should be able to easily pick up InternBuddy.
- InternBuddy is not required to handle concurrent users.
- InternBuddy is not required to make data available online.
Appendix B: Instructions for Manual Testing
Given below are instructions and test cases to test InternBuddy manually.
Launch and Shutdown
-
Initial launch
-
Download the InternBuddy jar file and copy into an empty folder.
-
Double-click the jar file.
Expected: Shows the GUI with a set of sample internships. The window size may not be optimal.
-
-
Saving window preferences
-
Resize the window to an optimum size. Move the window to a different location. Close the window.
-
Re-launch the app by double-clicking the jar file.
Expected: The most recent window size and location are retained.
-
List all Internships
-
listExpected: All internship entries are listed out and displayed in the List Panel.
-
list helloExpected: All internship entries are listed out and displayed in the List Panel.
-
list edit 1 n/ApplesExpected: All internship entries are listed out and displayed in the List Panel.
Add an Internship
-
add n/Visa r/Software Engineer s/New d/2023-03-01 c/Considering to apply t/PaymentExpected: A new internship entry is successfully added. The new internship entry will have company name
Visa, roleSoftware Engineer, statusNew, deadline of application2023-03-01, commentConsidering to apply, and tagPayment. The View Panel displays the information for this new internship entry, and a success message is displayed in the Result Display. -
add n/Mastercard r/Software Engineer s/New d/2023-03-01Expected: A new internship entry is successfully added. The new internship entry will have company name
Mastercard, roleSoftware Engineer, statusNew, deadline of application2023-03-01. The View Panel displays the information for this new internship entry, where the comment is shown asNA. A success message is displayed in the Result Display. -
add n/Visa s/New d/2023-03-01Expected: No new internship is added. An error message is displayed in the Result Display. This is because the compulsory field for role is missing.
-
add n/Visa r/Software Engineer s/Applying d/2023-03-01Expected: No new internship is added. An error message is displayed in the Result Display. This is because
Applyingis not a valid value for theSTATUSfield. -
add n/Visa r/Software Engineer s/Applied d/1st March 2023Expected: No new internship is added. An error message is displayed in the Result Display. This is because the field for
DATEmust be in the format ofYYYY-MM-DD. -
add n/Visa r/Software Engineer s/Applied d/2023-02-32Expected: No new internship is added. An error message is displayed in the Result Display. This is because
2023-02-32is not a valid date (i.e. March does not have 32 days). -
add n/Visa r/Software Engineer s/Applied d/2023-02-15 c/Expected: No new internship is added. An error message is displayed in the Result Display. This is because the
COMMENTfield cannot be left blank.
Edit an Internship
Assumptions: The sample data provided by InternBuddy is used, where there is a total of 7 internship entries.
-
edit 2 n/Amazon TechnologiesExpected: The company name of the second internship entry is updated to
Amazon Technologies. The View Panel displays the updated details of the second internship entry. -
edit 2 n/Amazon Technologies s/AppliedExpected: The company name and status of the second internship entry are updated to
Amazon TechnologiesandAppliedrespectively. The View Panel displays the updated details of the second internship entry. -
edit 2 t/front-endExpected: All previous tags for the second internship entry are removed, and a new tag
front-endis added. The View Panel displays the updated details of the second internship entry. -
edit 2 c/Expected: The comment of the second internship entry is updated to
NA. The View Panel displays the updated details of the second internship entry. - Successful editing through the filtered internship list
find n/Apple n/Googleedit 2 n/Google Technologies
Expected: The company name of the internship entry whose original company name is
Googleis updated to becomeGoogle Technologies. The View Panel displays the updated details for this internship entry. - Unsuccessful editing through the filtered internship list
find n/Apple n/Googleedit 3 n/Google Technologies
Expected: An error message is displayed in the Result Display. This is because in the filtered internship list, there are only 2 internship entries, implying that
3is not a valid value for theINDEXfield. -
edit 2 n/Amazon Technologies s/ApplyingExpected: No internship is edited. An error message is displayed in the Result Display. This is because
Applyingis an invalid status. -
editExpected: An error message is displayed in the Result Display. This is because a minimum of 1 optional field must be specified.
-
edit -2 n/Amazon TechnologiesExpected: An error message is displayed in the Result Display. This is because the
INDEXfield must be a positive integer greater than or equal to 1. -
edit 12 n/Amazon TechnologiesExpected: An error message is displayed in the Result Display. This is because there are only 7 internship entries in the sample data. Index 12 is out of range.
View an Internship
Assumptions: The sample data provided by InternBuddy is used, where there is a total of 7 internship entries.
-
view 2Expected: The View Panel displays the details for the second internship entry.
-
Successful viewing through the filtered internship list
find n/Apple n/Googleview 2
Expected: The View Panel displays the details for the second internship entry in the filtered internship list. In this case, it displays the details for the entry whose company name is
Google. - Unsuccessful viewing through the filtered internship list
find n/Apple n/Googleview 3
Expected: An error message is displayed in the Result Display. This is because in the filtered internship list, there are only 2 internship entries, implying that
3is not a valid value for theINDEXfield. -
view -1Expected: An error message is displayed in the Result Display. This is because the
INDEXfield must be a positive integer greater than or equal to 1. -
view 1 2Expected: An error message is displayed in the Result Display. This is because the
viewcommand does not support viewing of more than 1 internship entry simultaneously. -
view 12Expected: An error message is displayed in the Result Display. This is because there are only 7 internship entries in the sample data. Index 12 is out of range.
-
viewExpected: An error message is displayed in the Result Display. This is because the compulsory
INDEXfield is missing.
Copy an Internship to Clipboard
Assumptions: The sample data provided by InternBuddy is used, where there is a total of 7 internship entries.
-
copy 2Expected: The details of the second internship entry are copied to the clipboard.
-
Successful copying through the filtered internship list
find n/Apple n/Googlecopy 2
Expected: The details of the second internship shown in the List Panel will be copied to the clipboard. In this case, it copies the details for the entry whose company name is
Google. - Unsuccessful copying through the filtered internship list
find n/Apple n/Googlecopy 3
Expected: An error message is displayed in the Result Display. This is because in the filtered internship list, there are only 2 internship entries, implying that
3is not a valid value for theINDEXfield. -
copy -1Expected: An error message is displayed in the Result Display. This is because the
INDEXfield must be a positive integer greater than or equal to 1. -
copy 1 2Expected: An error message is displayed in the Result Display. This is because the
copycommand does not support copying of more than 1 internship entry simultaneously. -
copy 12Expected: An error message is displayed in the Result Display. This is because there are only 7 internship entries in the sample data. Index 12 is out of range.
-
copyExpected: An error message is displayed in the Result Display. This is because the compulsory
INDEXfield is missing.
Find Internships
Assumptions: The sample data provided by InternBuddy is used, where there is a total of 7 internship entries.
-
find n/AmazonExpected: The List Panel shows the internship entry whose company name matches with
Amazon. A success message is displayed in the Result Display. -
find n/Amazon n/GoogleExpected: The List Panel shows the internship entries whose company name matches with
AmazonorGoogle. A success message is displayed in the Result Display. - Finding through the filtered internship list
find n/Apple n/Googlefind n/Amazon
Expected: The List Panel shows the internship entry whose company name matches with
Amazon. This means that for thefindcommand, the search is always done in the unfiltered list even if the List Panel was showing a filtered list. -
findExpected: An error message is displayed in the Result Display. This is because a minimum of 1 optional field must be specified.
-
find s/Applied s/InterviewingExpected: An error message is displayed in the Result Display. This is because
Interviewingis not a valid value for theSTATUSfield. -
find n/Google n/Samsung s/Applied s/AssessmentExpected: Only the internship entry with company name
Googleand statusAssessmentis filtered out. This is because all other internship entries do not have a matching value with bothCompanyNameandStatus. -
find s/Assessment s/Interview t/GolangExpected: Only the internship entry with status
Assessmentand tagGolangis filtered out. This is because all other internship entries do not have a matching value with bothStatusandTag.
Get Upcoming Events and Deadlines
-
upcomingExpected: All internship entries with events or deadlines in the upcoming week are listed out and displayed in the List Panel.
-
upcoming helloExpected: All internship entries with events or deadlines in the upcoming week are listed out and displayed in the List Panel.
-
upcoming edit 1 n/ApplesExpected: All internship entries with events or deadlines in the upcoming week are listed out and displayed in the List Panel.
Delete Internships by Indices
Prerequisites: List all internships using the list command. Multiple internships are present in the list.
-
delete-index 1Expected: The first internship entry in the List Panel is deleted. If the View Panel was displaying the details of the deleted internship entry, it defaults to displaying the welcome message.
-
delete-index 1 2Expected: The first and second internship entry in the List Panel are deleted. If the View Panel was displaying the details of either of the deleted internship entries, it defaults to displaying the welcome message.
-
delete-index 3 1 3 3 1Expected: The first and third internship entries in the List Panel are deleted. If the View Panel was displaying the details of either of the deleted internship entries, it defaults to displaying the welcome message.
-
delete-indexExpected: An error message is displayed in the Result Display. This is because a minimum of 1 index must be specified.
Delete Internships by Fields
Assumptions: The sample data provided by InternBuddy is used, where there is a total of 7 internship entries.
-
delete-field n/AmazonExpected: The internship entry whose company name matches with
Amazonis deleted. A success message is displayed in the Result Display. -
delete-field n/Amazon n/GoogleExpected: The internship entries whose company name is either
AmazonorGoogleare deleted. A success message is displayed in the Result Display. - Deleting through the filtered internship list
find n/Apple n/Googledelete-field n/Amazon
Expected: No internship is deleted. This is because in the List Panel, there is no internship with company name
Amazon. This shows thatdelete-fieldsearches through the filtered list. -
delete-fieldExpected: An error message is displayed in the Result Display. This is because a minimum of 1 optional field must be specified.
-
delete-field s/Applied s/InterviewingExpected: An error message is displayed in the Result Display. This is because
Interviewingis not a valid value for theSTATUSfield. -
delete-field n/Google n/Samsung s/Assessment s/AppliedExpected: Only the internship with company name
Googleand statusAssessmentis deleted, because all the other internships do not have a matching field for bothCompanyNameandStatus. -
delete-field s/Assessment s/Interview t/AndroidExpected: Only the internship with status
Interviewand tagAndroidis deleted, because all the other internships do not have a matching field for bothStatusandTag.
Clear all Internships
-
clearExpected: All internship entries are deleted. The View Panel displays the welcome message.
-
clear helloExpected: All internship entries are deleted. The View Panel displays the welcome message.
-
clear edit 1 n/ApplesExpected: All internship entries are deleted. The View Panel displays the welcome message.
Get Help
-
helpExpected: The help window opens.
-
help helloExpected: The help window opens.
-
help edit 1 n/ApplesExpected: The help window opens.
Exit InternBuddy
-
exitExpected: InternBuddy closes.
-
exit helloExpected: InternBuddy closes.
-
exit edit 1 n/ApplesExpected: InternBuddy closes.
Save Data
-
Missing Data File
Prerequisite: There is no file called
internbuddy.jsonin thedatasubfolder of the folder where InternBuddy is located.- If you have an existing
internbuddy.jsonfile, delete the file. - Double-click InternBuddy’s jar file.
Expected: InternBuddy launches with the sample internship data shown in the List Panel. There is a total of 7 internship entries.
- If you have an existing
-
Corrupted Data File
Prerequisite: There is a file called
internbuddy.jsonin thedatasubfolder where InternBuddy is located.- Ensure that InternBuddy is not running. If it is running, close it.
- Open the file
internbuddy.json. - In
internbuddy.json, locate any line that contains the wordCompanyName. - Highlight the line located and delete the entire line.
- Save the
internbuddy.jsonfile and close it. - Launch InternBuddy.
Expected: No entry is shown in the List Panel. InternBuddy starts afresh with 0 internship entry.
Appendix C: Planned Enhancements
While we strive to make InternBuddy a perfect product for you, there are nevertheless areas of improvement. Hence, we are constantly striving to make InternBuddy better. This appendix documents some of the areas that our team is currently working on, and we would release them in the future once their functionalities have been finalised.
Make Prefixes Case-Insensitive
Problem
Prefixes are case-sensitive, hence command arguments such as T/ will be interpreted as plain text. In InternBuddy, command prefixes are lowercase. For example, add n/Visa r/Software Engineer s/New d/2023-03-01 t/javascript T/react will add an internship entry with company name
Visa, role Software Engineer, status New, deadline of application 2023-03-01,
and tag javascript T/react (refer to Figure 19).
Therefore, it is possible to add substrings such as T/, C/ or R/ to any of the fields, even though the user could have intended to enter t/, c/ or r/.
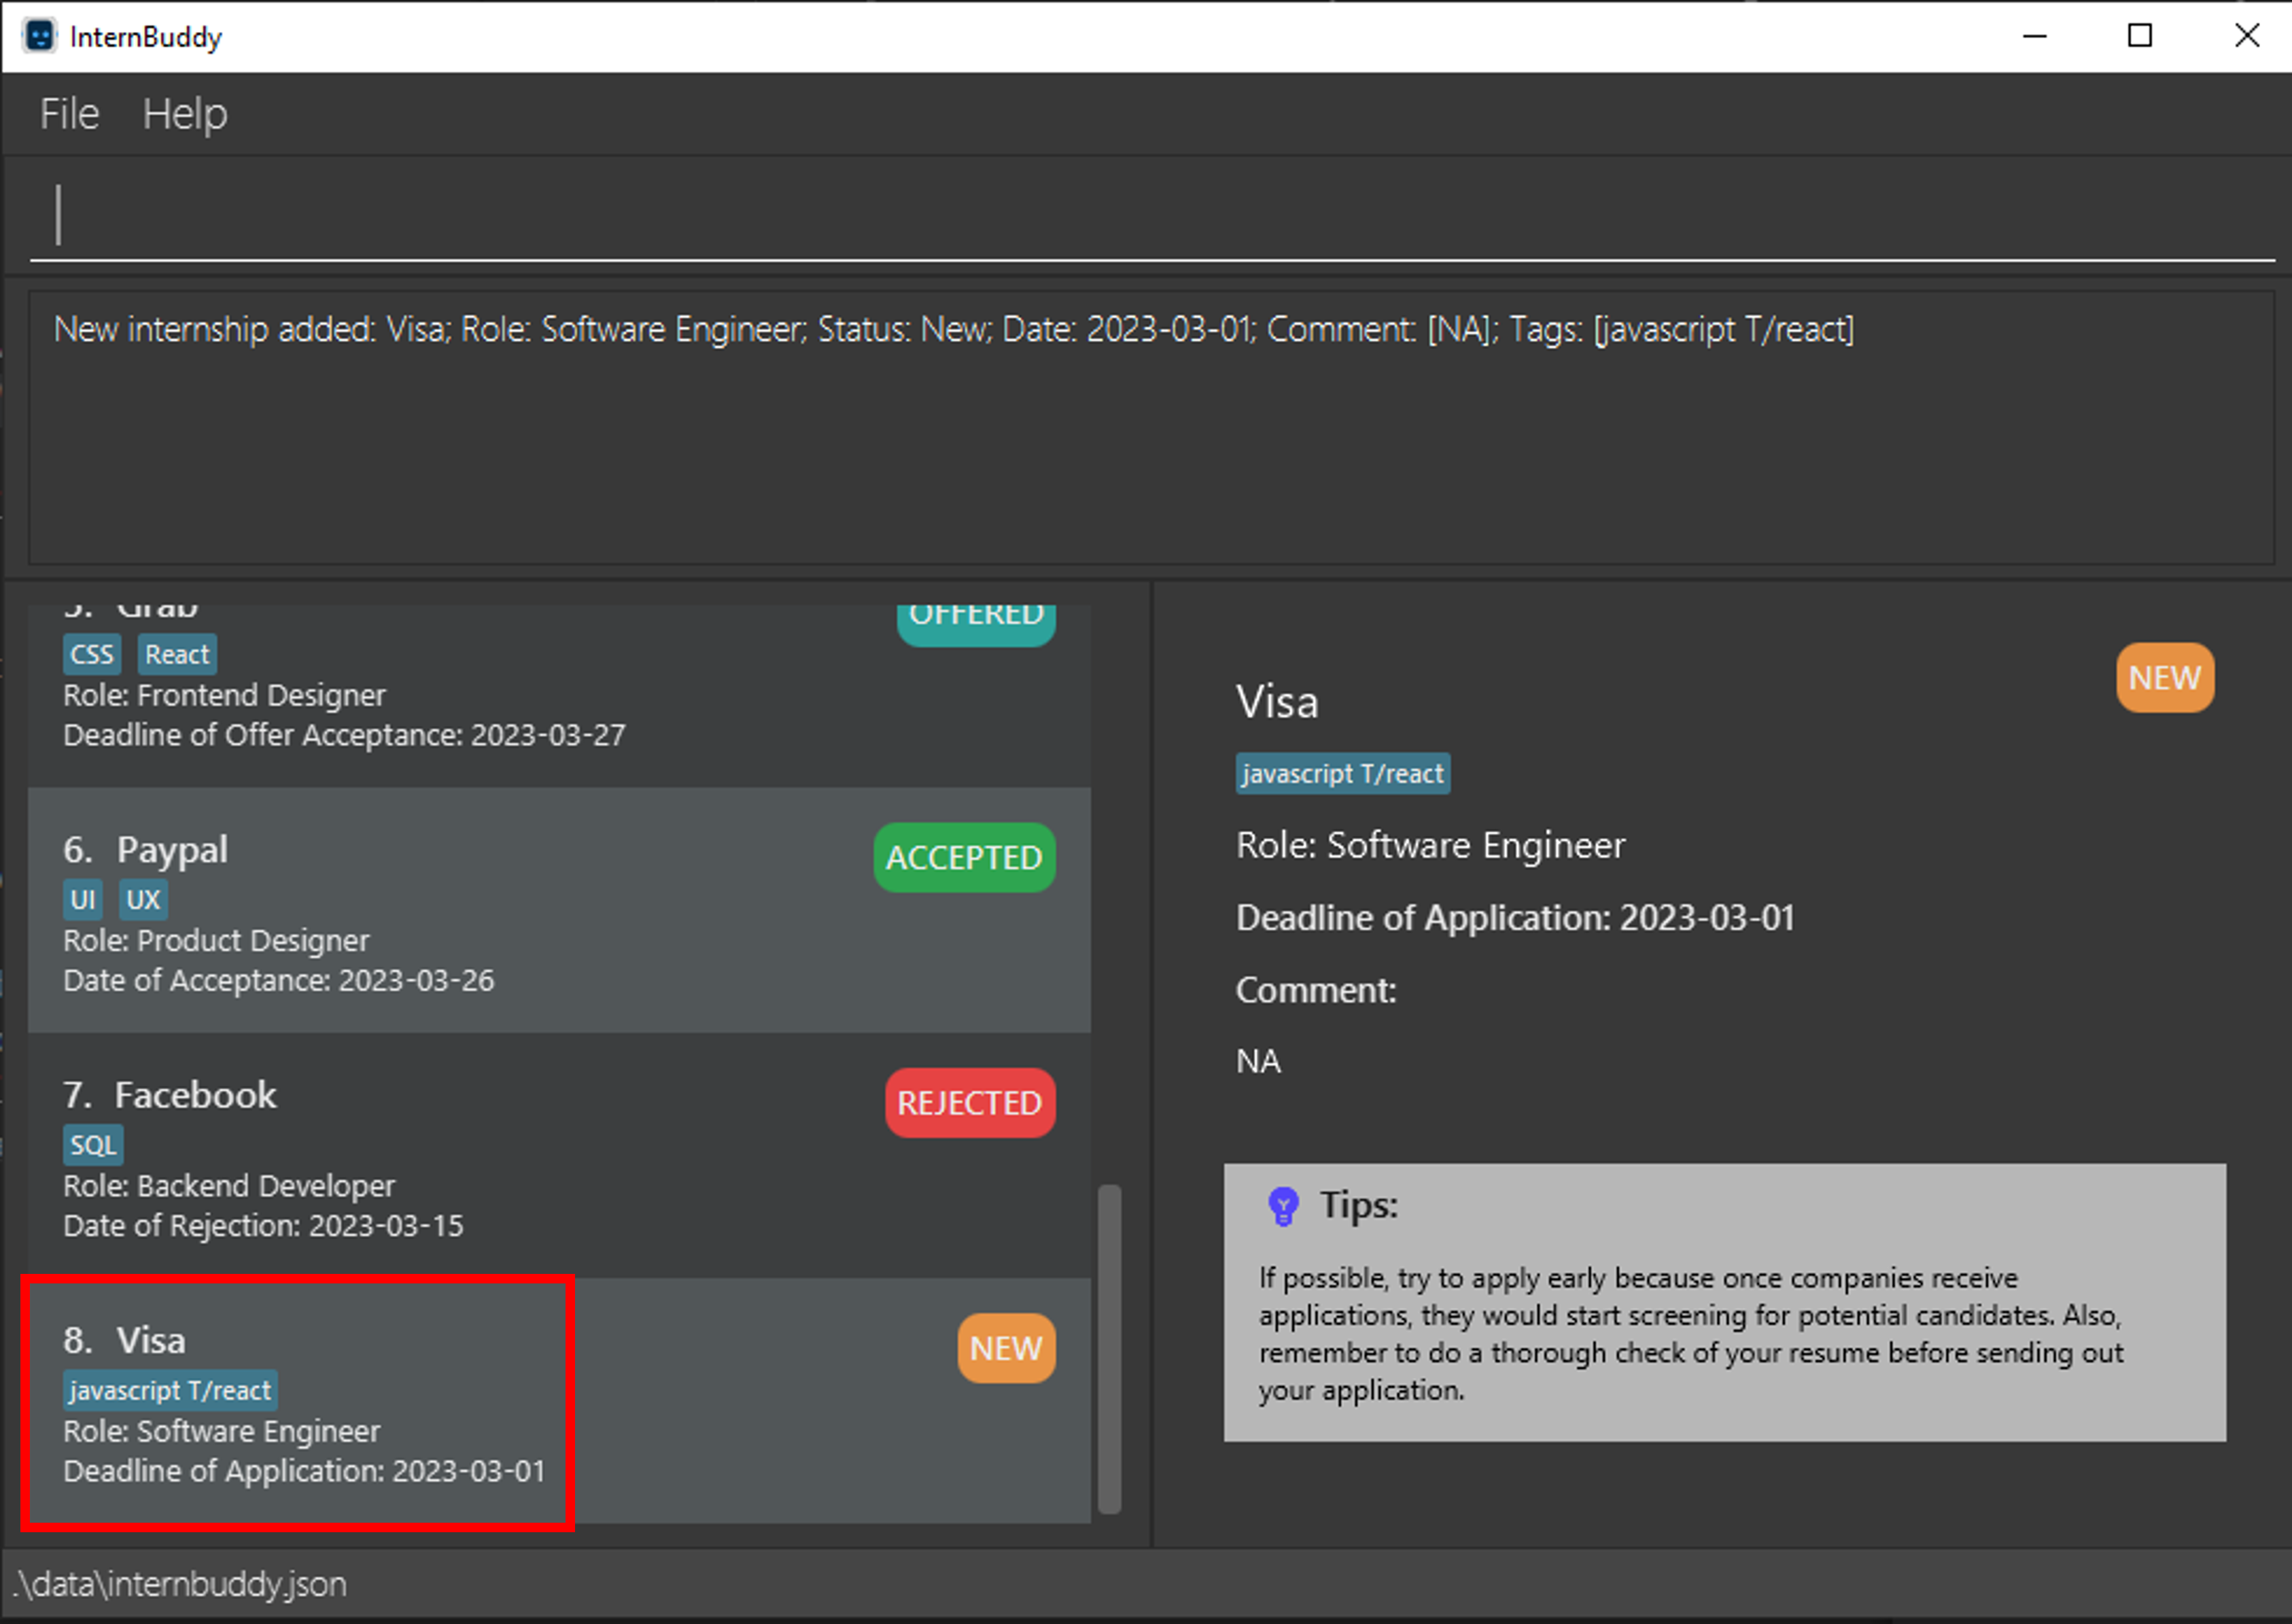
Figure 19: Adding the tag 'javascript T/react'
We originally intended for this design to allow maximum flexibility for the user. If the user had entered something wrongly, it is possible to just use the command edit. However, this design could have an unintentional side-effect.
To illustrate this side effect, we use an example of the find command. find t/javascript t/react tries to find entries with either the tag javascript or react (refer to Figure 20). Tag matching is case-insensitive, so it also tries to find Javascript or React (refer to Figure 21). Similarly, delete-field t/javascript t/react tries to delete entries with either the tag javascript or react or Javascript or React.
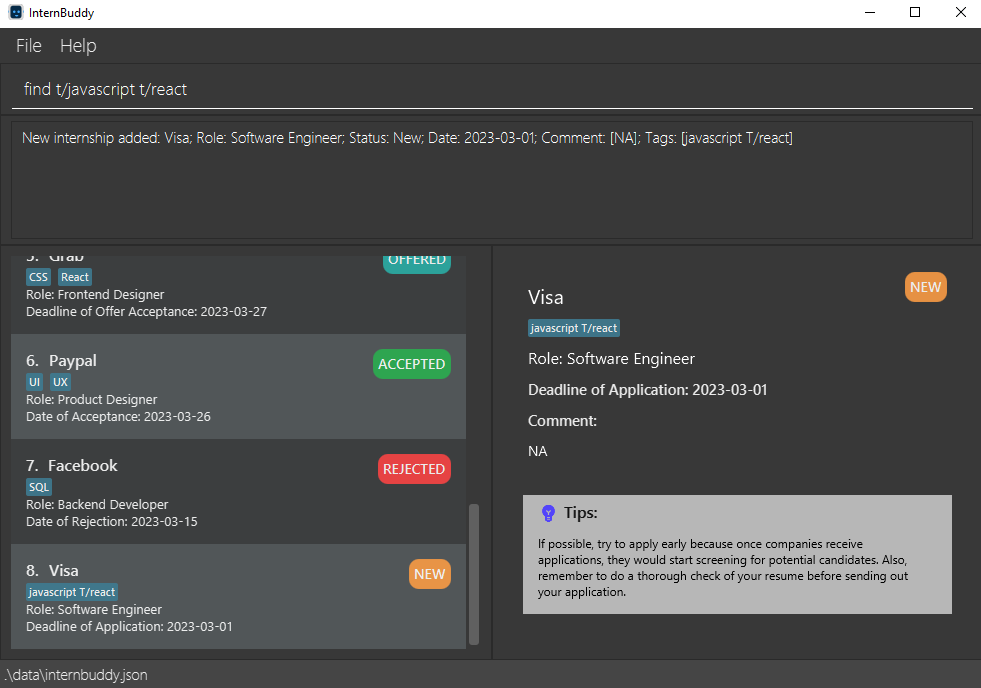
Figure 20: Find the tags "javascript" and "react"
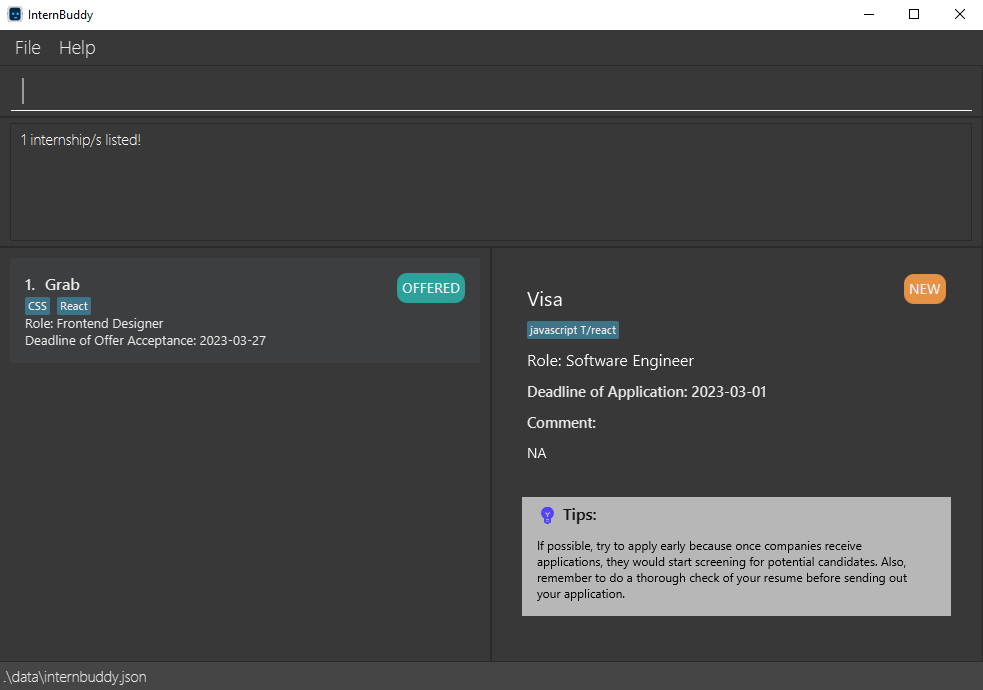
Figure 21: Result of the find command in figure 20
There could be another conflicting meaning of the command. In this case, instead of trying to find entries with either the tag javascript or react, the user could have intended to find the tag javascript T/react. This could lead to some confusion.
Proposed Design Tweak
Make prefixes for all commands with prefixes (add, edit, find, delete-field) case-insensitive. For example, add n/Visa r/Software Engineer s/New d/2023-03-01 t/javascript t/react should have the same result as add n/Visa r/Software Engineer s/New d/2023-03-01 t/javascript T/react, where t/ and T/ both refer to the tag field. The new internship entry will have company name Visa, role Software Engineer, status New, deadline of application 2023-03-01, and the tags javascript and react. The View Panel displays the information for this new internship entry, and a success
message is displayed in the Result Display. Do refer to Figures 22 and 23 for an illustrated example.
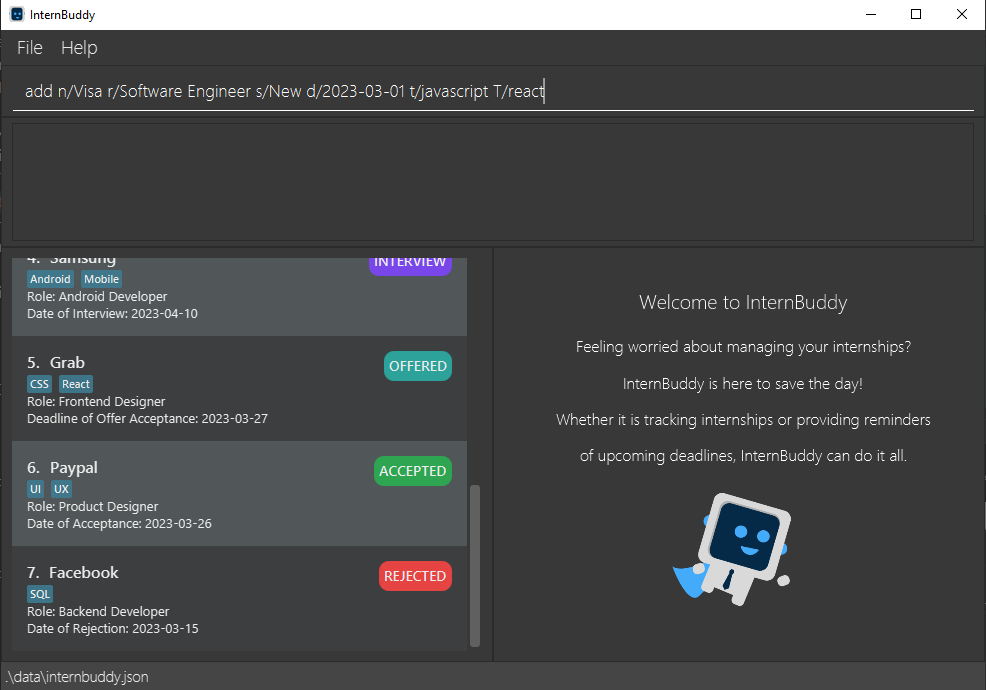
Figure 22: Adding a new entry with case-insensitive prefix
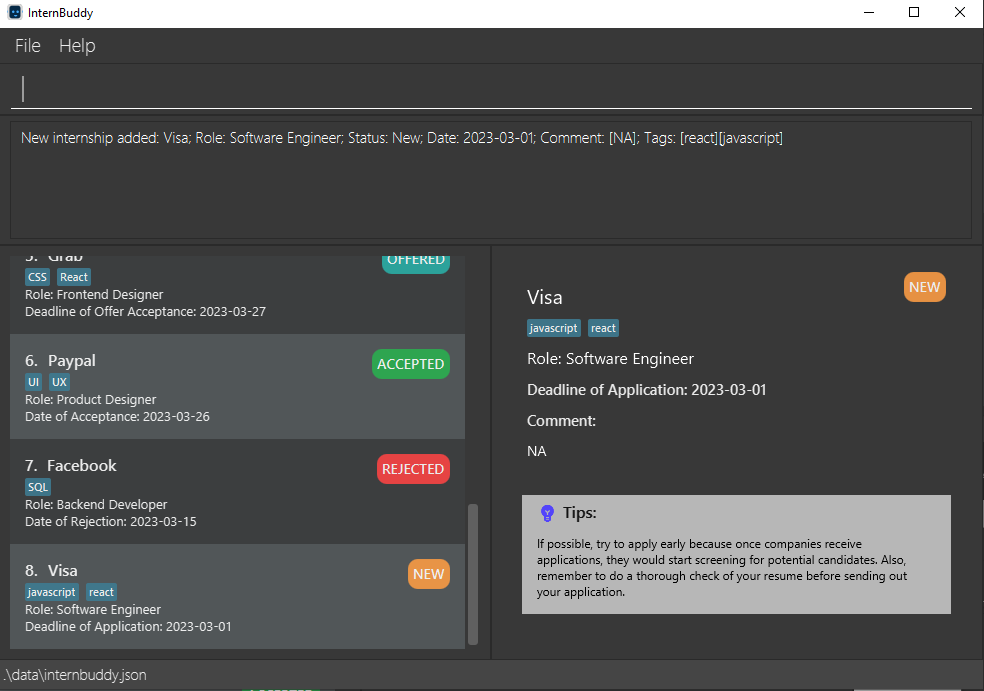
Figure 23: Result of the add command in figure 22
A possible implementation is to change the findPrefixPosition() method in seedu.internship.logic.parser.ArgumentTokenizer as shown in Figure 24. Instead of finding the first exact match of the prefix, the method tries to find the first case-insensitive match of the prefix.
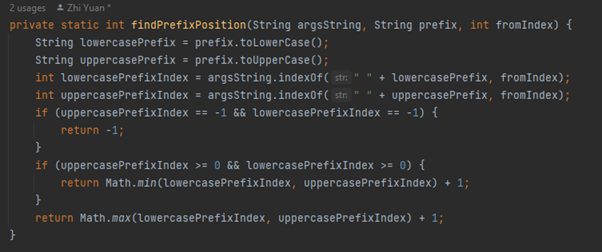
Figure 24: The parser checks for both lowercase prefix and uppercase prefix
This would address the above problem. For example, find t/javascript t/react should have the same result as find T/javascript T/react. This would remove the confusion as substrings such as T/ cannot be entered in any of the fields.
Inaccurate Error Message for Integer Overflow
Problem
There are currently 4 types of commands that require internship indices: edit, view copy and delete-index.
However, the current implementation of the parsing of these indices does not take into account integer overflows, which is when the integer is too large or too small for InternBuddy to compute.
When trying to parse these integers, it recognises that they are either too large or too small and treats them as not an integer. As a result, InternBuddy is unable to differentiate between internship index inputs that are not integers and are integer overflows.
Thus, an invalid command format error message is displayed when these integer overflows are inputted (refer to Figure 25), instead of an index out of range error message when the integer is too large or an invalid index error message when the integer is too small.

Figure 25: Invalid command format error message is returned even though internship index is an integer
Proposed Design Tweak
We plan to display the invalid index and out of range index error messages even when there is a negative and positive integer overflow respectively.
- When InternBuddy recognises an input as not an integer, we can check if the input begins with the negative sign and is followed by only digits or contains only digits (refer to Figure 26).
- If the latter is true, there is a negative integer overflow and InternBuddy can be configured to display an invalid index error message (refer to Figure 27).
- If the former is true, there is a positive integer overflow and InternBuddy can be configured to display an index out of range error message (refer to Figure 28).
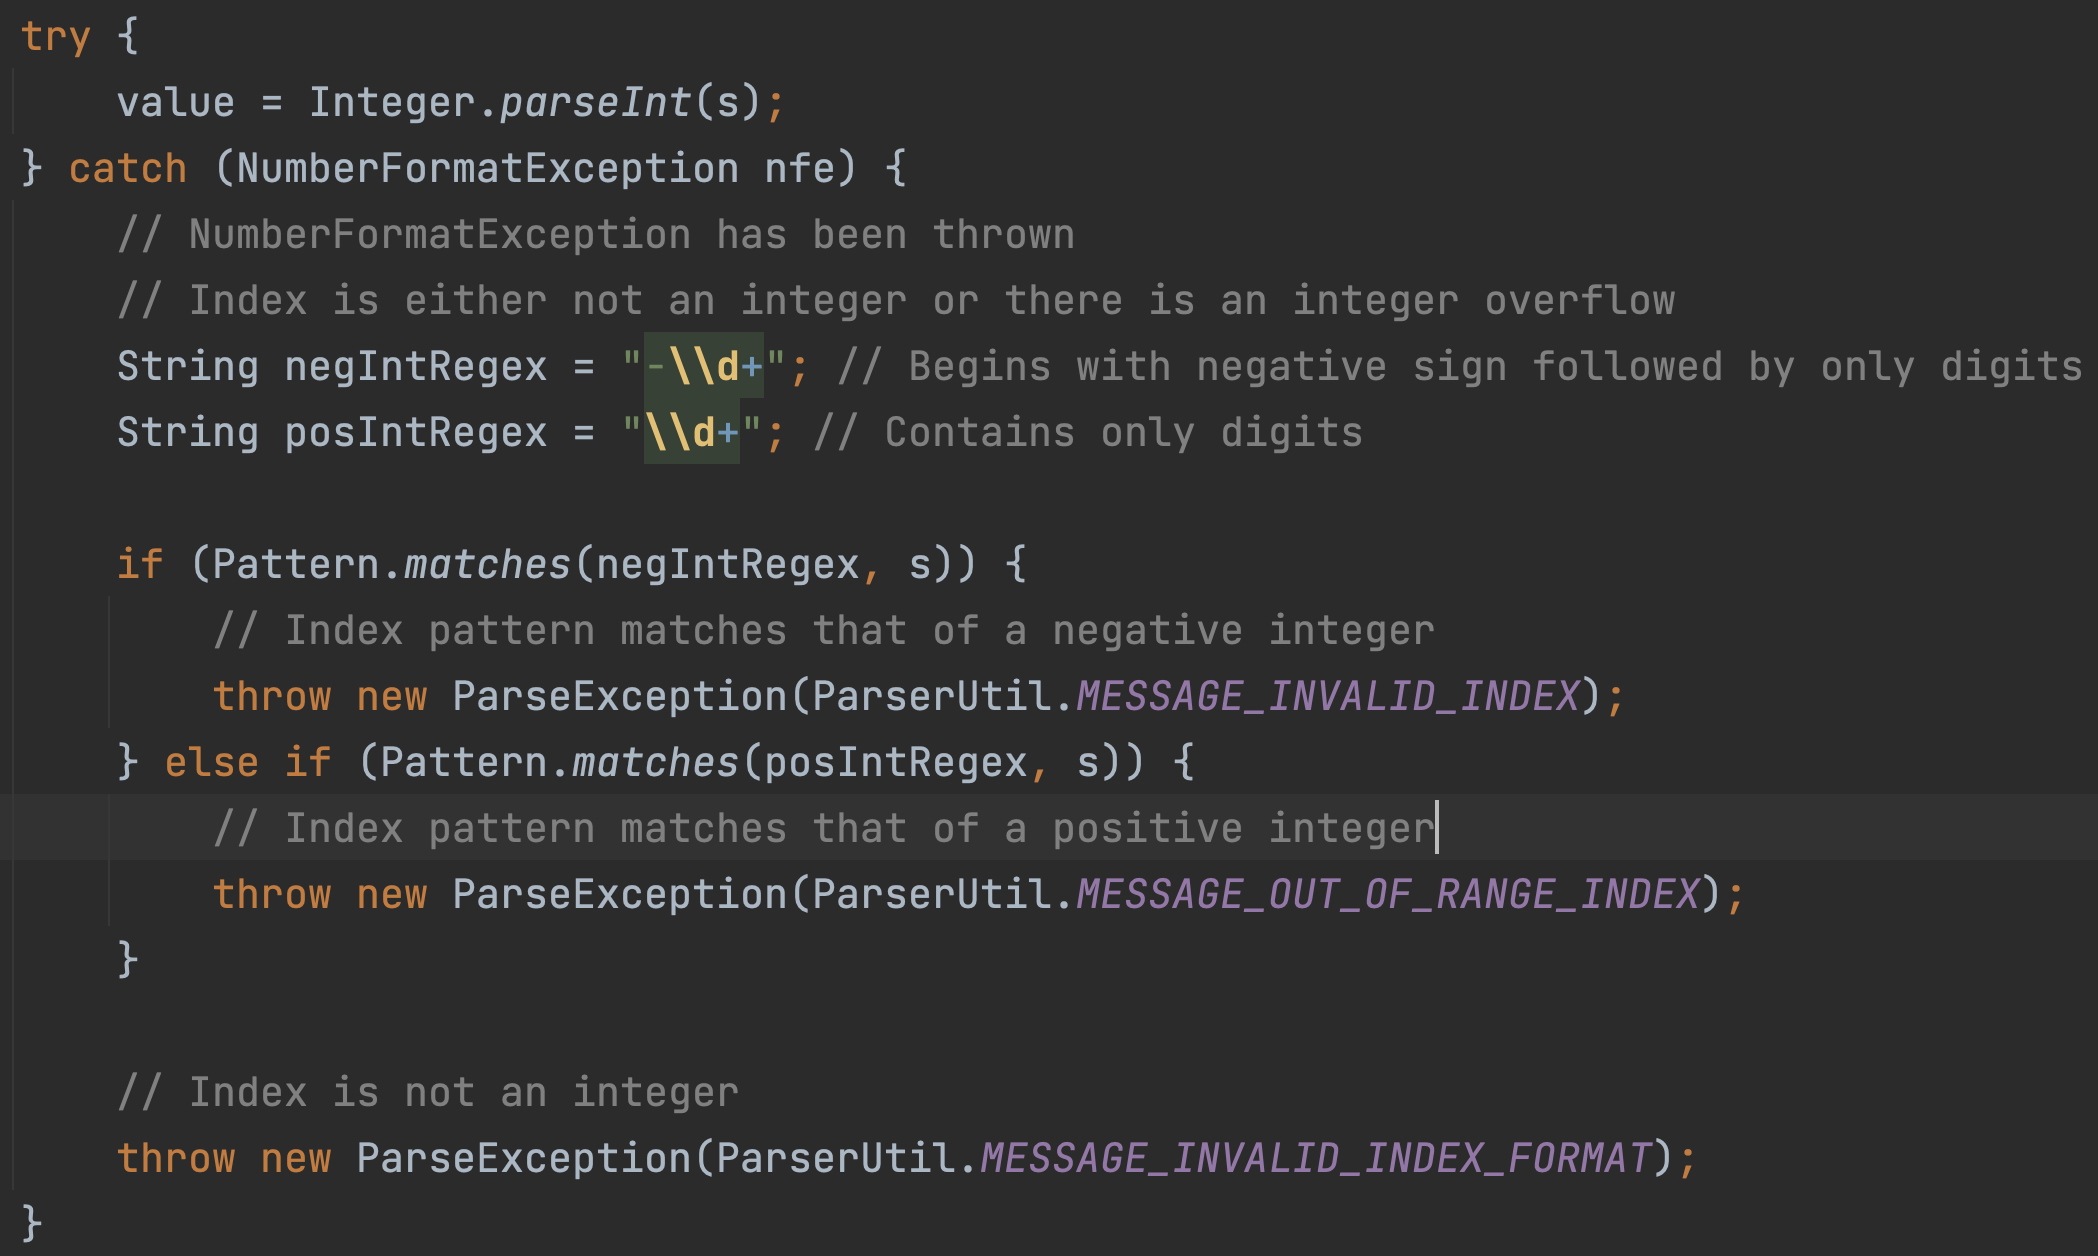
Figure 26: Checking of input added when InternBuddy recognises that it isn't an integer

Figure 27: Invalid index error message displayed when there is negative integer overflow

Figure 28: Out of range index error message displayed when there is positive integer overflow
Appendix D: Effort
InternBuddy is a brownfield project adapted from AddressBook Level 3. Our team morphed it from a contact management application to an internship tracker that is designed for Computing undergraduates. Development took place over 4 sprints which spanned a period of 2-3 months.
Difficulty Level
For most of our team members, InternBuddy is the first brownfield project that we have undertaken. Dealing with a large code base is no simple feat. Therefore, our team went with a more conservative approach of focusing our efforts on refactoring and enhancing existing features to suit our product. This enabled us to create a functional product at the end of our sprints, with a lower likelihood of encountering bugs.
Challenges
There are several challenges that we faced during the development phase.
-
Understanding and Refactoring the Code Base
-
AddressBook Level 3 is a project with around 6k lines of
code. Much effort was required in understanding how the different components (e.g.
ModelandLogic) interact with one another. As our team decided to morph the project, we had to refactor a significant amount of code. - For example,
Personhad to be refactored intoInternship, and classes likePhoneandEmailwere no longer relevant, and we had to transform them into classes likeRoleandStatus.
-
AddressBook Level 3 is a project with around 6k lines of
code. Much effort was required in understanding how the different components (e.g.
-
Matching of Multiple Fields
- The original
findcommand in AddressBook Level 3 does matching by only one field,Name. - We wanted to extend the functionality of the
findcommand to enable matching by multiple fields. - There were many possible options on how to implement it, and we struggled to find an implementation that is both simple-to-understand and intuitive to use.
- We eventually decided on using exact matching and a mix of both OR and AND relationships, as explained
in the implementation for the
findcommand.
- The original
-
Responsive User Interface
- It was challenging to set up the View Panel to make it respond
to both the
viewcommand and the user interactions with the List Panel, as programming the GUI is something new to many of us. - Furthermore, we had to ensure that the text wraps smoothly when the interface is resized. In other words, the wrapping width had to scale with screen size. It took us time to learn how to do it in code, and how to adjust our JavaFX components accordingly.
- It was challenging to set up the View Panel to make it respond
to both the
Achievements
Our team is proud to have successfully morphed the project from a contact management application to an internship tracker. InternBuddy offers a total of 13 different features.
- 3 features that are unmodified from AddressBook Level 3 (
list,clear,exit). - 6 features that are modified from AddressBook Level 3 (
add,edit,find,delete-index,delete-field,help). - 1 feature that is adapted from HackNet (Navigating through Past Commands).
- 3 new features implemented by our team (
view,copy,upcoming)
In the area of testing, our team has managed to increase code coverage to 79.55%. This is made possible with GUI testing, where we received help from AddressBook Level 4 and Please Hire Us.
Glossary
Table 3 provides the glossary for the terms used in this developer guide.
| Term | Definition |
|---|---|
| Command | An instruction for InternBuddy to perform an action. |
| Command Line Interface (CLI) | A CLI is the text-based interface that you can use to provide instructions to your computer. Examples of instructions include opening files and running programs. |
| Computing undergraduate | A university undergraduate pursuing a Computing degree. |
| Graphical User Interface (GUI) | A GUI is the visual interface that you see when an application launches, allowing you to interact with it by clicking on its various buttons and components. |
| Mainstream Operating Systems | Include Windows, macOS, Linux and Unix. |
| Field | A part of the command where you have to supply a value for the command to be valid. |
| Prefix | A short form for the name of a field. It indicates which field does a value belongs to. For example, in n/Apple, the value Apple is supplied to the field COMPANY_NAME since the n/ prefix is used. |
| Tech Stack | A set of technologies that an individual or company uses to create and/or maintain a software system or product. |
Table 3: Glossary for Developer Guide
Acknowledgements
- InternBuddy is written in Java 11.
- It is adapted from the AddressBook Level 3 project created by the SE-EDU initiative.
- Libraries and frameworks used: JavaFX, Jackson, JUnit5 and TestFX.
- GUI testing was implemented with references from AddressBook Level 4 and Please Hire Us. We utilised code from these projects to set up GUI testing, then added our own test cases to test the UI components that we created ourselves.
- The feature of Navigating Through Past Commands was primarily adapted from HackNet, but we added code modifications and test coverage.
- The sections on explaining the formatting standards and GUI interface in the User and Developer Guides are inspired by Please Hire Us.