User Guide
Table of Contents
- Table of Contents
- Introducing InternBuddy
- About the User Guide
- Quick Start
- Exploring the Graphical User Interface
- Command Information
-
Features
- Listing all Internships :
list - Adding an Internship :
add - Editing an Internship :
edit - Viewing an Internship :
view - Copying an Internship to Clipboard :
copy - Finding Internships :
find - Getting Upcoming Events and Deadlines :
upcoming - Deleting Internships by Indices :
delete-index - Deleting Internships by Fields :
delete-field - Clearing all Internships :
clear - Getting Help :
help - Exiting InternBuddy :
exit - Navigating through Past Commands
- Saving your Internship Data
- Loading the Data
- Listing all Internships :
- FAQ
- Command Summary
- Appendix A: Installing Java 11
- Appendix B: Customising the Data File
- Appendix C: Populating InternBuddy with Sample Data
- Glossary
- Acknowledgements
Introducing InternBuddy
InternBuddy is a desktop application for university undergraduates to manage their internship applications. It is optimized for typing where it allows you to complete internship management tasks much more efficiently via the keyboard as compared to using traditional Graphical User Interface (GUI) applications. If you are a fast typist who is seeking a one-stop platform to systematically organise your internship applications, then InternBuddy is the perfect buddy to accompany you during your internship hunt.
InternBuddy runs using Java 11 and is available on the Windows, macOS, and Linux operating systems.

About the User Guide
Objectives of the User Guide
This user guide aims to provide comprehensive instructions for learning how to use InternBuddy, including details on the installation process and features. For more advanced users, this guide will also help customize your experience.
Using the User Guide
This uses guide uses a set of formatting standards and visuals to better communicate information.
Information Box
Tip Box
Warning Box
Syntax Highlighting
Commands, fields, file paths and class names are highlighted.
command, FIELD, filepath.json, ClassName
Keyboard Actions
Keyboard keys are indicated using rounded buttons.
Quick Start
- Ensure you have Java
11or above installed in your computer.
 Info: If you are unsure of whether you have Java 11 installed, or need help installing
it, you can refer to Appendix A.
Info: If you are unsure of whether you have Java 11 installed, or need help installing
it, you can refer to Appendix A.
-
Download the latest
internbuddy.jarfrom here. - Copy the file
internbuddy.jarto the folder you want to use as the home folder for InternBuddy.
Info: The home folder is the folder that you will navigate to when you want to launch
InternBuddy. It will contain a subfolder where your InternBuddy data will be stored.
- Double-click on the file
internbuddy.jarto launch InternBuddy. A GUI similar to Figure 1 should appear in a few seconds. Note how the app contains some sample data.
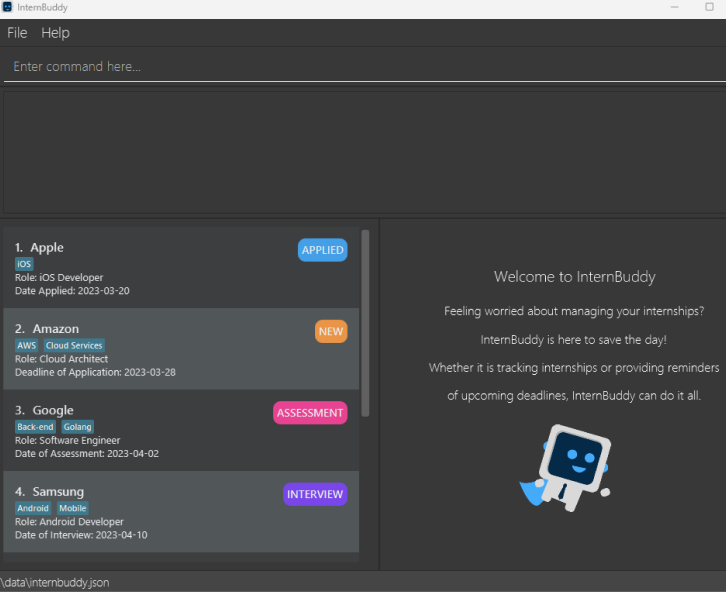
Figure 1: InternBuddy's GUI
-
You can interact with InternBuddy by typing into the box with the text
Enter command here..., then pressing to execute your command. For example, typinghelpand pressing will open the help window. -
Here are some other example commands you can try:
-
list: Lists all internships stored in InternBuddy -
add n/Food Panda r/Web Developer s/Applied d/2023-04-01: Adds a new internship into InternBuddy. -
delete-index 3: Deletes the 3rd internship of the current list displayed in InternBuddy. -
exit: Exits InternBuddy.
-
Do refer to Features below for a comprehensive list of supported features and their associated details.
Exploring the Graphical User Interface
Figure 2 provides a visual representation of the different parts of InternBuddy’s GUI, while Table 1 explains what each part is used for.
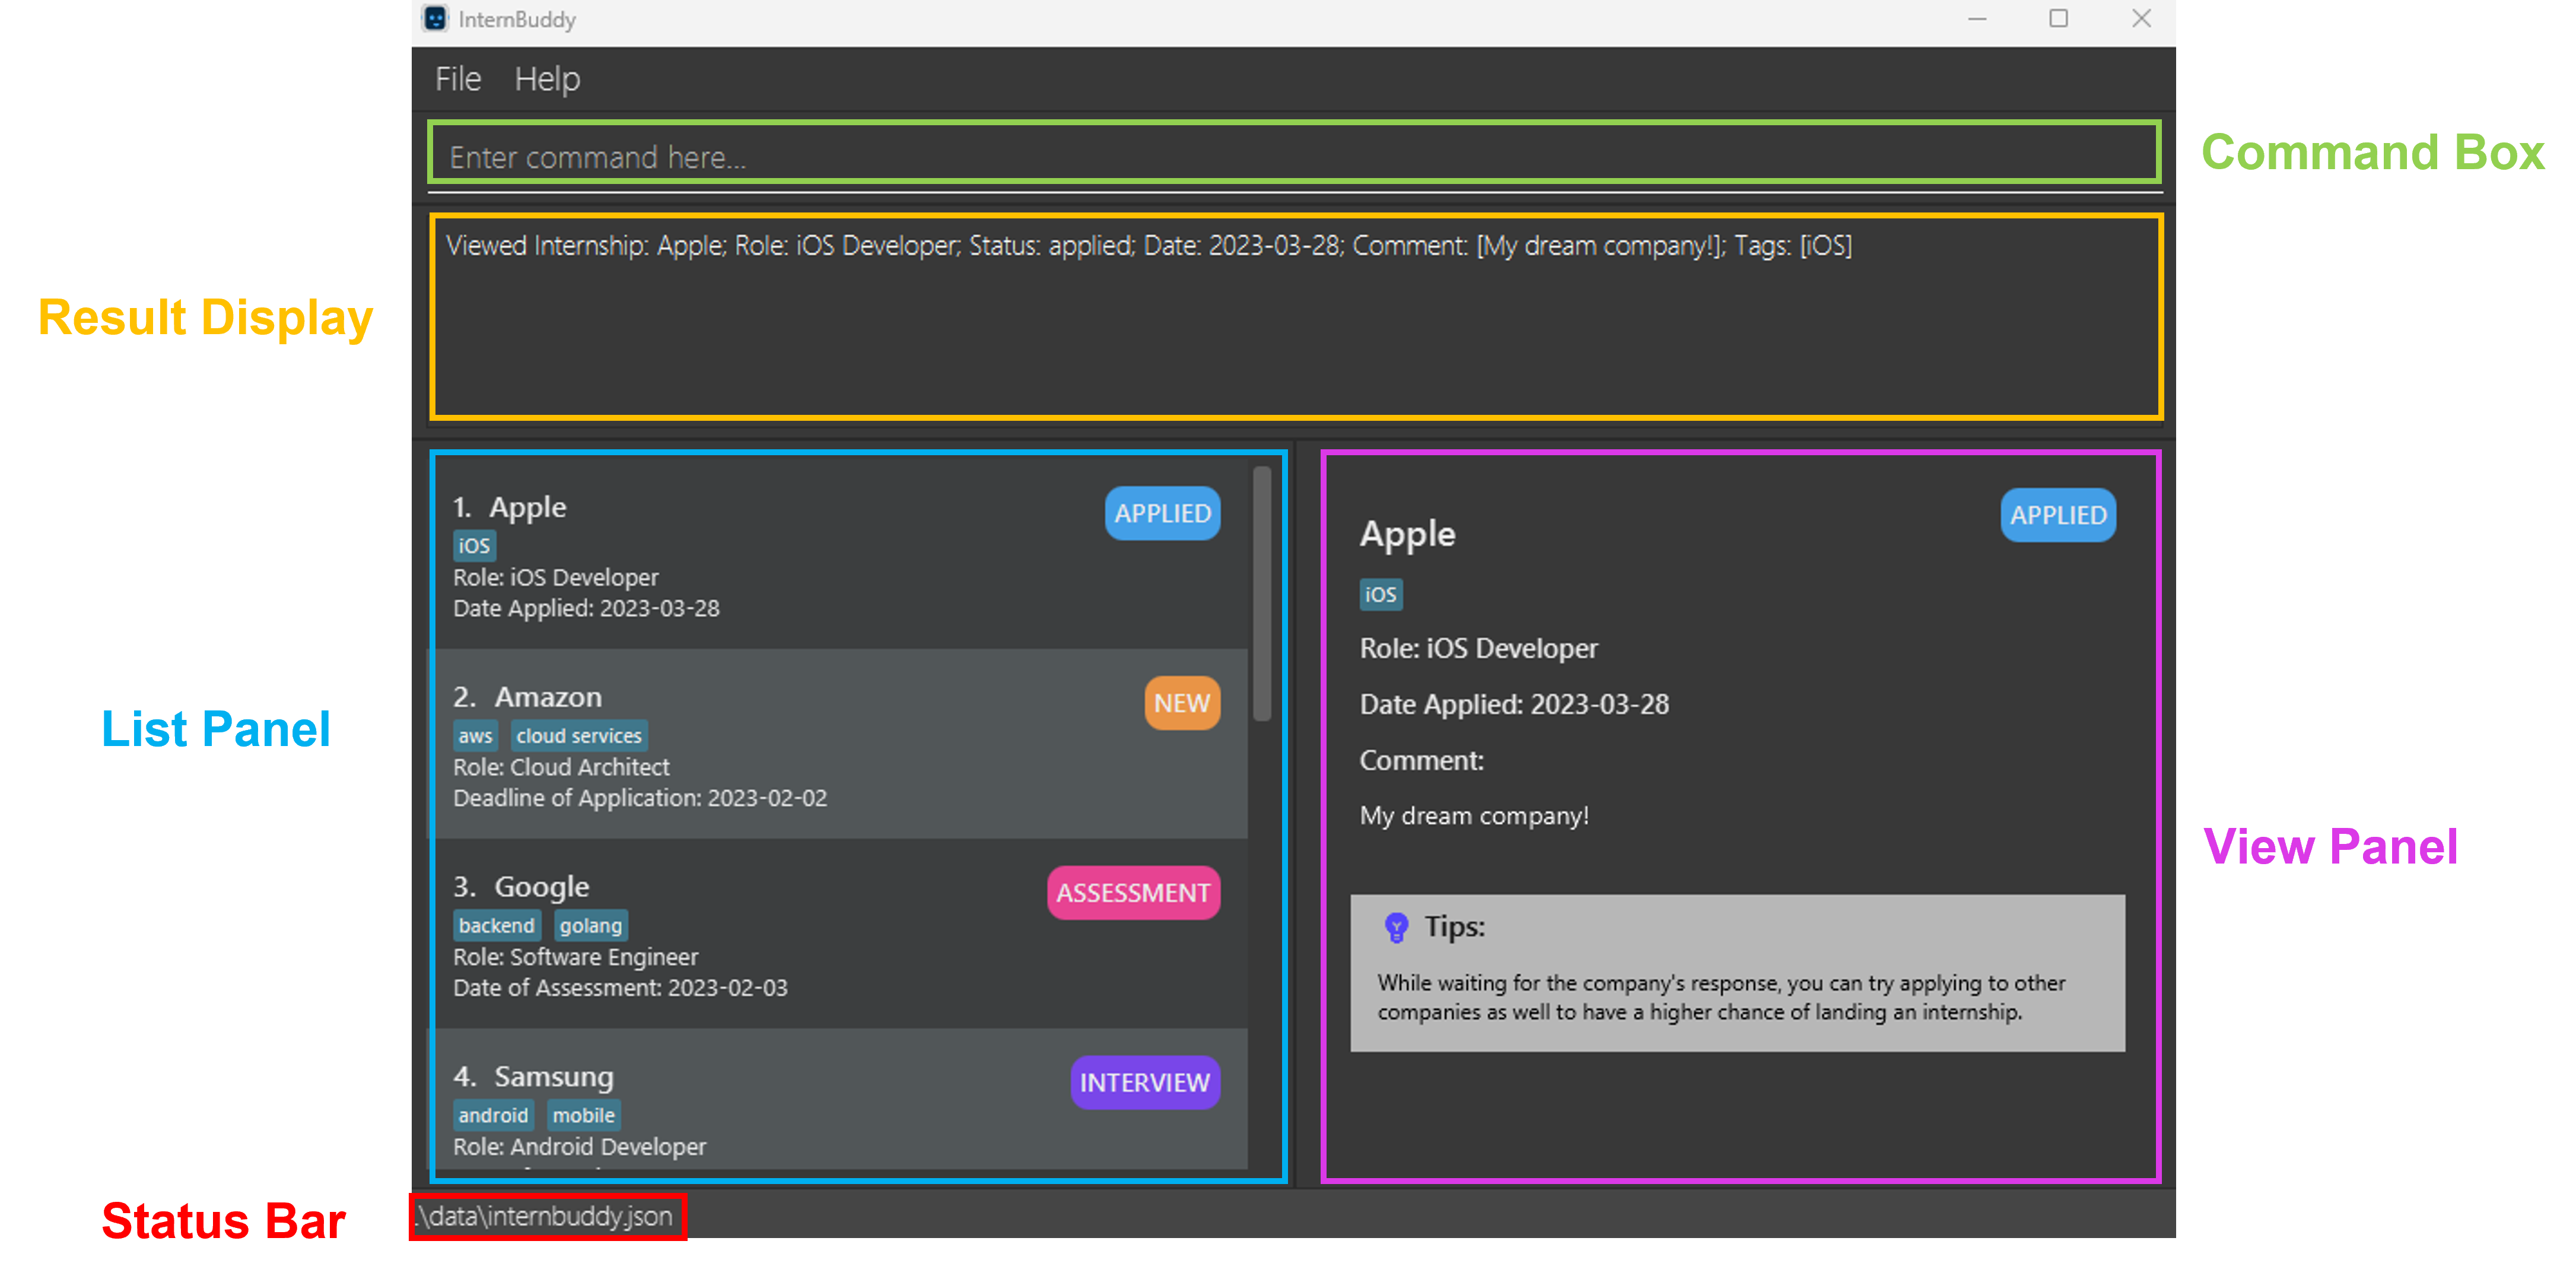
Figure 2: Different parts of InternBuddy's GUI
| Part | Usage |
|---|---|
| Command Box | You can type in your commands here to interact with InternBuddy. |
| Result Display | This is where the results of your command will be displayed. |
| List Panel | Displays a list of internship entries. |
| View Panel | Displays either the welcome message or detailed information of a specified internship entry. |
| Status Bar | States where your InternBuddy data file is located on your computer. |
Table 1: Explanation of the different parts of InternBuddy's GUI
Command Information
Command Format
-
Words in
UPPER_CASEare the fields that are to be supplied by you.
e.g. If the command format isadd n/COMPANY_NAME, you may input the command asadd n/Applewhere you supply the valueAppleto the fieldCOMPANY_NAME. -
Items in square brackets are optional.
e.g. If the command format isedit INDEX [n/COMPANY_NAME] [c/COMMENT], you may input the command asedit 2 n/Applewhere you omit the value for the fieldCOMMENT. -
Items with
… after them can be used multiple times including zero times.
e.g.[t/TAG]…can be used as ` ` (i.e. 0 times),t/Java,t/Java t/Pythonetc. -
Fields can be in any order.
e.g. If the command format isn/COMPANY_NAME r/ROLE, bothn/Apple r/Software Engineerandr/Software Engineer n/Appleare acceptable. -
If a field is expected only once in the command, but you specified it multiple times, only the last occurrence of the field will be taken.
e.g. If the command format isr/ROLE, typing inr/Front-end Developer r/Back-end Developerwill cause your input to be interpreted asr/Back-end Developer. -
Extraneous values for commands that do not take in fields (such as
help,list, andexit) will be ignored.
e.g. If the command format ishelp, typing inhelp 123will cause your input to be interpreted ashelp. -
Command names are case-sensitive. For example,
helpwill work, butHELPorHelpwill not.
Prefixes and Constraints for Fields
In InternBuddy’s commands, we refer to a range of fields that you can replace with values to input information that is customised to your internship applications.
There are 3 important things that you should note:
- Most fields have associated prefixes.
- Prefixes are short character combinations that you can use to identify the field to which a value belongs. They are a convenient shorthand that allows you to refer a field without having to type out its entire name, saving precious time.
- For example, in
add n/Apple, the valueAppleis associated with the fieldCOMPANY_NAMEsince then/prefix is used. - Prefixes are case-sensitive.
n/will work butN/will not.
- When entering a command, do remember to use spaces to separate different fields of information. If you enter multiple fields without using space(s) to separate them, InternBuddy will interpret them as a single field.
- For example,
edit 1 n/Visa r/Software EngineerassociatesVisawith the fieldCOMPANY_NAMEandSoftware Engineerwith the fieldROLE. - Conversely,
edit 1 n/Visar/Software EngineerassociatesVisar/Software Engineerwith the fieldCOMPANY_NAME.
- For example,
- There are constraints that you must adhere to when replacing fields with values.
- Constraints differ based on the fields.
- If you do not adhere to these constraints and enter invalid values, an error message will be displayed in the Result Display when you press . The message will alert you to the invalid input and provide information on how to correct the command.
Table 2 provides a summary of the fields with their descriptions, prefixes and constraints.
| Field | Description | Prefix | Constraints |
|---|---|---|---|
COMPANY_NAME |
The name of the company | n/ |
Cannot be blank and must be at most 50 characters. |
ROLE |
The role that you applied for | r/ |
Cannot be blank and must be at most 50 characters. |
STATUS |
The status of the internship application | s/ |
Must be one of the following: New, Applied, Assessment, Interview, Offered, Accepted, Rejected. Note that this is not case-sensitive. |
DATE |
The date associated with the internship application | d/ |
Must be a valid date in the format of YYYY-MM-DD. |
COMMENT |
A comment that you can make on an internship application | c/ |
Cannot be blank (except when used in the edit command). |
TAG |
A label that you can give to an internship application | t/ |
Cannot be blank (except when used in the edit command) and must be at most 30 characters. |
INDEX |
The index number of the internship entry as displayed in the List Panel | - | A positive integer that is smaller than or equal to the largest index number shown in the List Panel. Note that 0 is not a positive integer. |
Table 2: Fields with their descriptions, prefixes and constraints
Details on STATUS and DATE
The field STATUS represents the current status of an internship application. It can only take on one
of the following values: New, Applied, Assessment, Interview, Offered, Accepted and Rejected.
Note that this is not case-sensitive. Table 3 explains the meaning of each status.
STATUS |
Description |
|---|---|
New |
You have recently saw this internship opportunity and would like to record it in InternBuddy. Also, you have yet to apply for it. |
Applied |
You have applied for this internship opportunity and you are currently waiting for the company’s response. |
Assessment |
You are currently in the technical assessment stage of the application process. |
Interview |
You are currently in the behavioral interview stage of the application process. |
Offered |
You have been offered the internship opportunity. |
Accepted |
You have accepted the internship opportunity. |
Rejected |
You have either been rejected by the company, or that you have rejected the internship offer. |
Table 3: Description of statuses
Depending on the status of the internship application, the DATE field will be interpreted differently. Table 4
documents the meaning of DATE with respect to each STATUS value.
STATUS |
Interpretation of DATE
|
|---|---|
New |
Deadline of Application |
Applied |
Date Applied |
Assessment |
Date of Technical Assessment |
Interview |
Date of Behavioral Interview |
Offered |
Deadline of Offer Acceptance |
Accepted |
Date of Acceptance |
Rejected |
Date of Rejection |
Table 4: Description of dates
Duplicate Internships
InternBuddy does not allow for the storage of duplicate internships. Should you enter a command that attempts to store a duplicate internship, InternBuddy will remind you that the internship already exists.
2 internships are considered to be duplicates if they have matching COMPANY_NAME, STATUS, ROLE and
DATE. The comparison is case-insensitive.
In Table 5, internships A and B are considered as duplicate internships, because they have the same
COMPANY_NAME, ROLE, STATUS and DATE. Note how the capitalisation differences in COMPANY_NAME
and ROLE do not affect the comparison.
Field |
Internship A | Internship B |
|---|---|---|
COMPANY_NAME |
||
ROLE |
Frontend Engineer | frontend engineer |
STATUS |
New | New |
DATE |
2023-02-02 | 2023-02-02 |
COMMENT |
NA | NA |
TAGS |
C++ | Java |
Table 5: Duplicate internships
Meanwhile, in Table 6, internships C and D are not considered as duplicate
internships, because they have different values for COMPANY_NAME.
Field |
Internship C | Internship D |
|---|---|---|
COMPANY_NAME |
Apple | Apple Inc |
ROLE |
Frontend Engineer | frontend engineer |
STATUS |
New | New |
DATE |
2023-02-02 | 2023-02-02 |
COMMENT |
NA | NA |
TAGS |
Java | Java |
Table 6: Non-duplicate internships
Duplicate Tags
If you attempt to store duplicate tags within the same internship entry, InternBuddy would only store one of them. A duplicate tag refers to a tag that is identical to another tag in every way, including the spelling and capitalisation (tags are case-sensitive). In other words, a duplicate tag is a tag that is an exact copy of another tag.
Features
InternBuddy offers a variety of features that can empower you to systematically track your internships.
Listing all Internships : list
Shows the list of all internship entries that you have stored in InternBuddy.
Format: list
Adding an Internship : add
Do you have a new internship to track? Add it to InternBuddy using the add command.
Format: add n/COMPANY_NAME r/ROLE s/STATUS d/DATE [c/COMMENT] [t/TAG]...
- The optional
COMMENTfield has a default value ofNA. This means that if you do not specify any value for it, the comment for the newly added internship will beNA. - The optional
TAGfield will be empty by default. This means that if you do not specify any value for it, there will be no tags associated with the newly added internship.
Examples:
-
add n/Food Panda r/Web Developer s/New d/2023-02-01 c/I love Food Panda! t/React t/Front-endAdds a new internship entry with company nameFood Panda, roleWeb Developer, statusNew, deadline of application2023-02-01, commentI love Food Panda!and tagsReactandFront-End. This example is illustrated in Figure 3. -
add n/Deliveroo r/Software Engineer s/Assessment d/2023-02-01Adds a new internship entry with company nameDeliveroo, roleSoftware Engineer, statusAssessmentand date of technical assessment2023-02-01. -
add n/Food Panda s/New d/2023-02-01Displays an error because theROLEfield is missing. -
add n/Apple r/App Developer s/New d/2023-02-01 t/Java t/JavaAdds a new internship entry with company nameApple, roleApp Developer, statusNew, deadline of application2023-02-01, and tagJava(only one tag is stored since the two tags provided are duplicates).
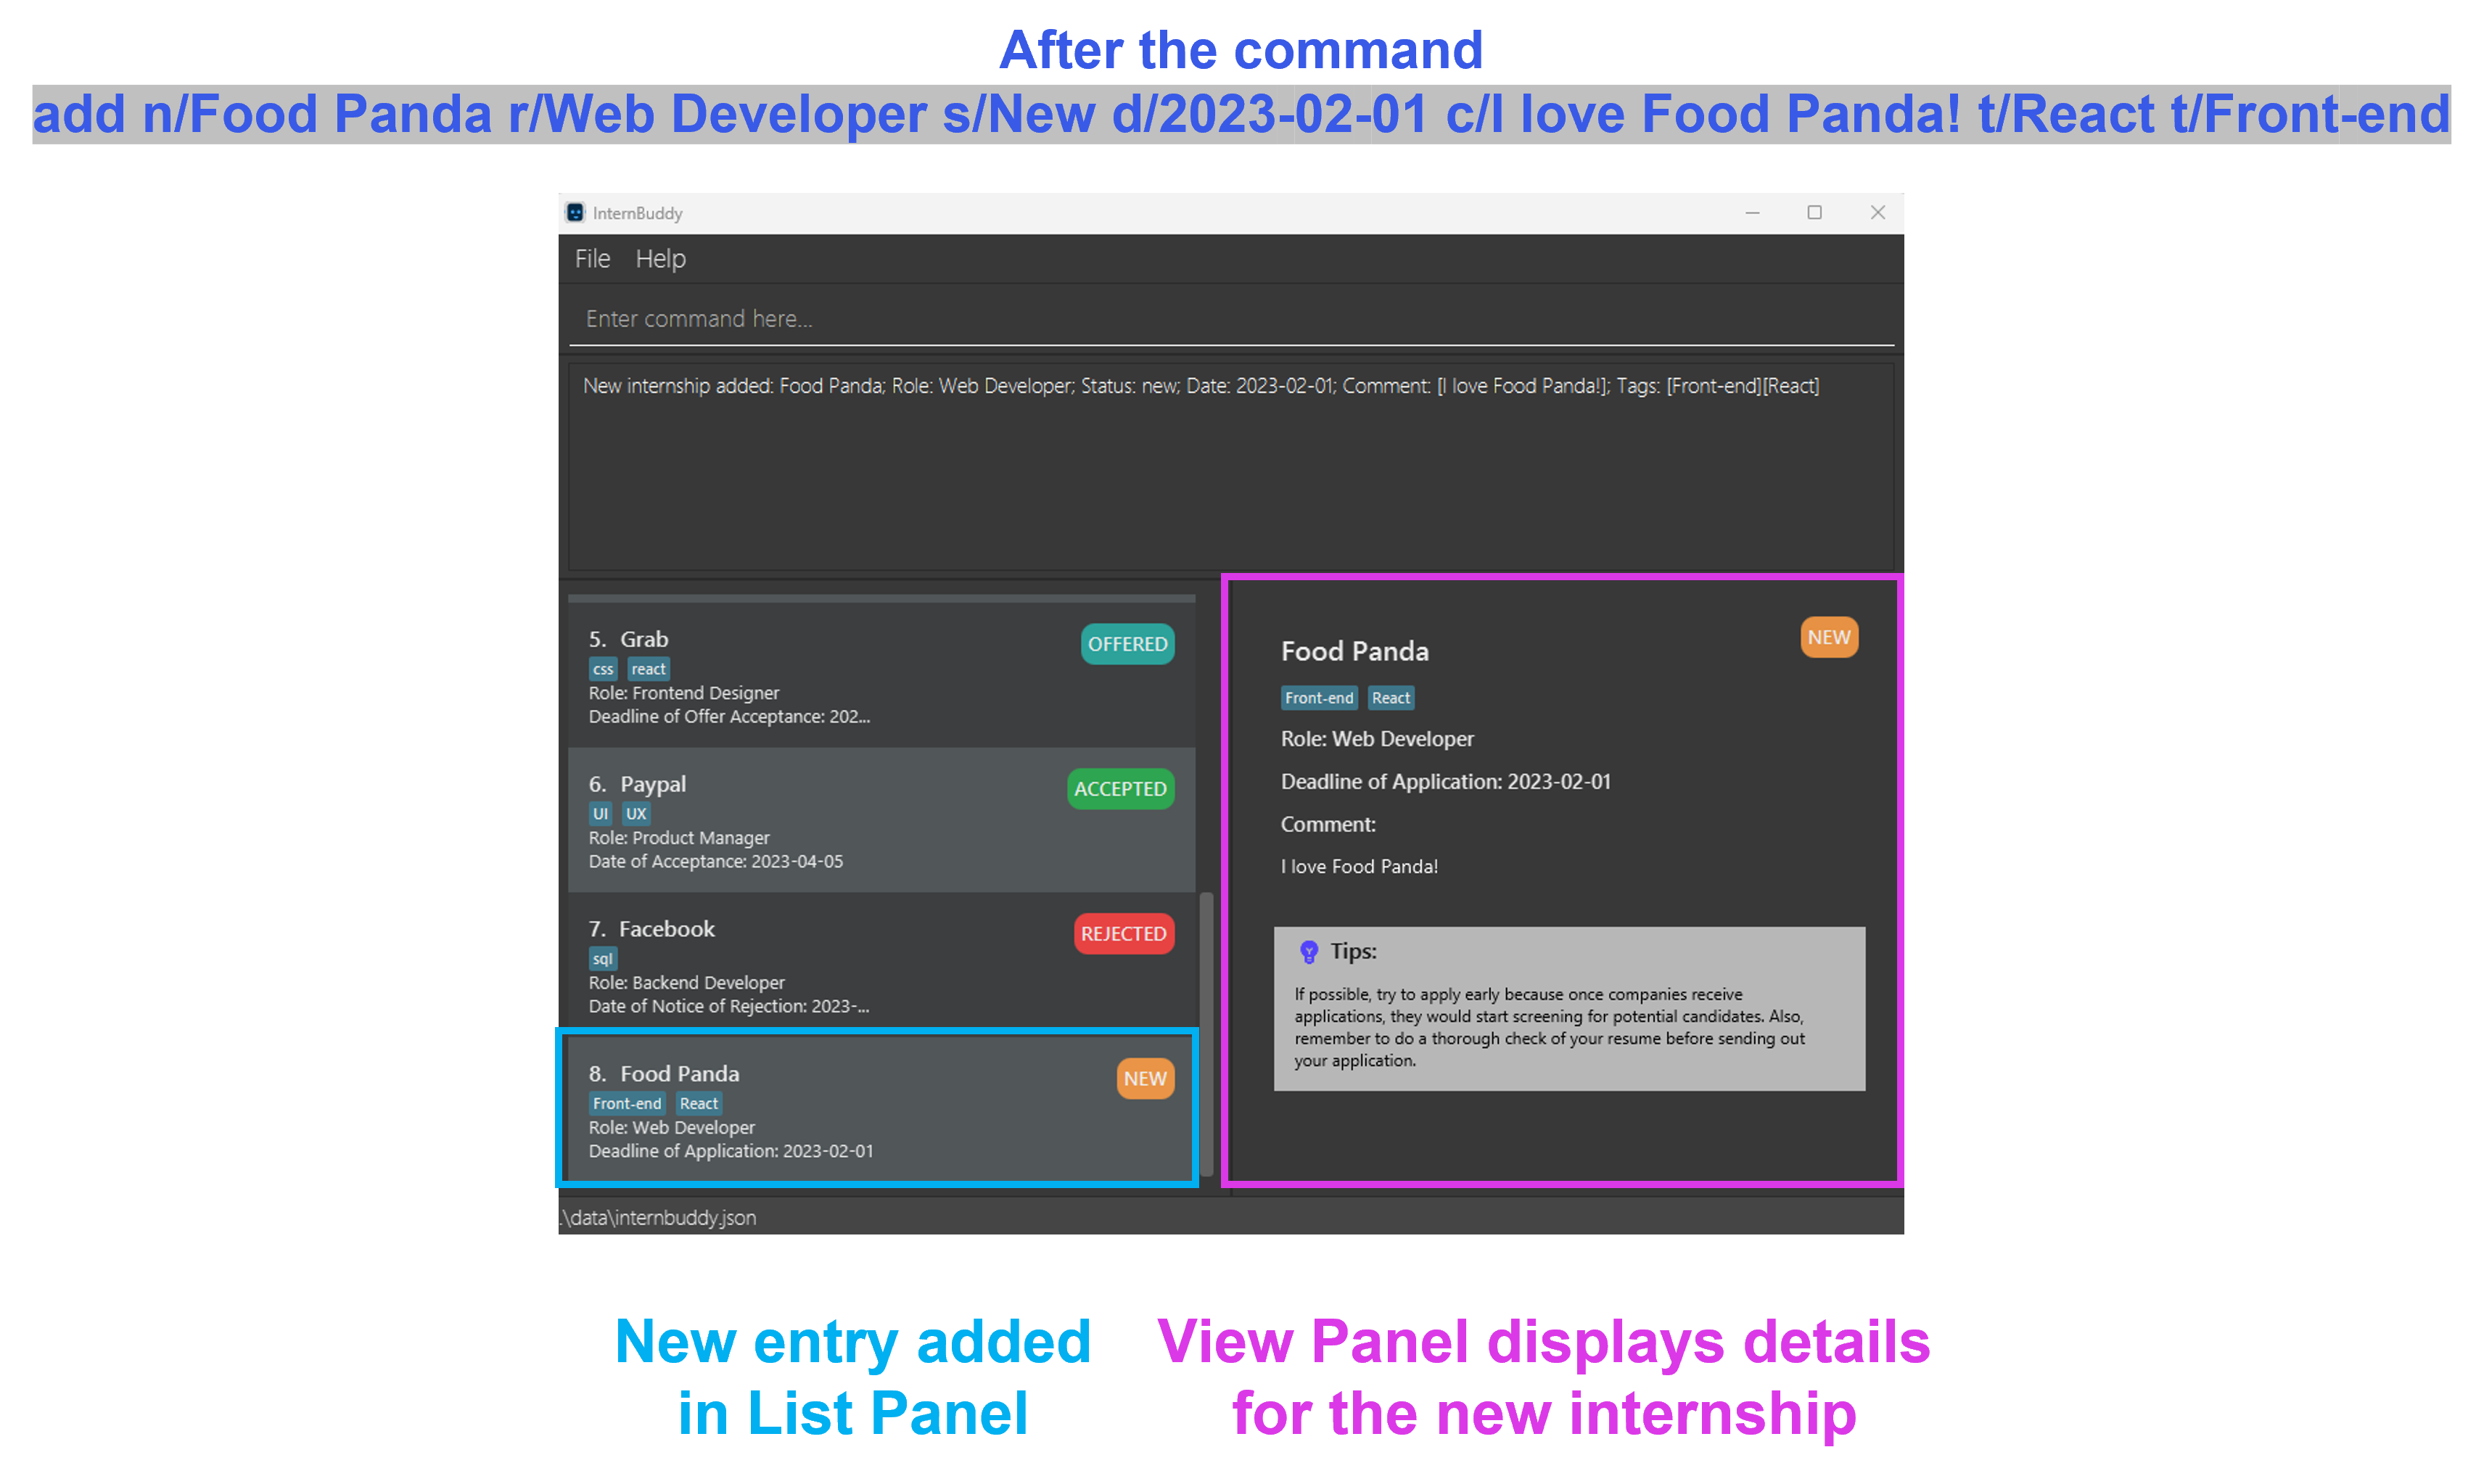
Figure 3: Example of the add command in action
Editing an Internship : edit
Made a mistake, or wish to update your internship entry? The edit command allows you to make modifications.
Format: edit INDEX [n/COMPANY_NAME] [r/ROLE] [s/STATUS] [d/DATE] [c/COMMENT] [t/TAG]...
- Edits the internship whose index number is
INDEX. - You have to provide at least one of the optional fields.
- You can reset the comment of an internship to the default value of
NAby typingc/without specifying any comments after it. - You can remove all of an internship’s tags by typing
t/without specifying any other tags after it.
iOS and Swift, editing the internship via edit 1 t/macOS will lead
to the internship only having the tag macOS. To have all 3 tags, you need to type edit 1 t/iOS t/Swift t/macOS.
Examples:
Suppose you have at least 2 internships displayed in the List Panel.
-
edit 2 s/Assessment r/Software DeveloperSets the status and role of the second internship entry asAssessmentandSoftware Developerrespectively. This example is illustrated in Figure 4. -
edit 2Displays an error because the command does not satisfy the criteria of having at least one optional field. -
edit 2 t/Java t/GoSets the tags of the second internship entry as Java and Go (existing tags will be removed). -
edit 2 c/Sets the comment of the second internship entry to beNA. -
edit 2 t/Removes all the tags of the second internship entry.

Figure 4: Example of the edit command in action
Viewing an Internship : view
Want to view the details of a specific internship entry? You can do so using the view command.
Format: view INDEX
- Views the details of the internship entry with index number
INDEXas indicated in the List Panel. - The details will be shown in the View Panel.
- Apart from the internship details, a custom tips box is also included in the View Panel. The tips provide you with suggestions on how to improve your internship experience, where their content change according to the status of the internship entry.
Examples:
-
view 3Assuming that you have at least 3 internships displayed in the List Panel, this displays the details of the third internship in the View Panel. -
view -1Displays an error becauseINDEXmust be a positive integer. -
view 8Assuming that you have 7 internships displayed in the List Panel, this displays an error becauseINDEXcannot be greater than the maximum index shown in the List Panel, which is 7 in this case.
Copying an Internship to Clipboard : copy
Need to quickly export the details of an internship? Use copy to copy the details of an internship to
your clipboard.
Format: copy INDEX
- Copies the details of the internship entry with index number
INDEXas indicated in the List Panel. - The copied text will be in the format of
Company Name: COMPANY_NAME; Role: ROLE; Status: STATUS; Date: DATE; Comment: [COMMENT]; Tags: [TAG].
Examples:
-
Suppose the first internship displayed in the List Panel has company name
Amazon, roleCloud Architect, statusNew, date2023-03-28, commentI love Amazon!, and tagsAWSandCloud Services. Then,copy 1copiesCompany Name: Amazon; Role: Cloud Architect; Status: New; Date: 2023-03-28; Comment: [I love Amazon!]; Tags: [Cloud Services][AWS]to your clipboard. -
copy -1Displays an error becauseINDEXmust be a positive integer. -
copy 8Assuming that you have 7 internships displayed in the List Panel, this displays an error becauseINDEXcannot be greater than the maximum index shown in the List Panel, which is 7 in this case.
Finding Internships : find
Want to locate selected internship entries? Use the find command to filter through
your entries and narrow down your search.
Format: find [n/COMPANY_NAME]... [r/ROLE]... [s/STATUS]... [d/DATE]... [t/TAG]...
- You have to provide at least one of the optional fields.
- The
findcommand is case-insensitive, and it returns exact matches only. For example,find n/Google Ltdwill not return an entry with company nameGooglebecauseGoogledoes not exactly match withGoogle Ltd. On the other hand,find t/Javawill return an entry with tagjavabecause the search is case-insensitive.
There are 2 possible ways for you to use the find command.
Method 1: Use a single field type
e.g. find s/Applied, find s/Applied s/New, find n/Google n/Apple n/Meta
- The
findcommand returns all internship entries that match with any of the values that you provide.
More examples:
-
find s/Applied s/Newreturns all internship entries that have a status of eitherAppliedorNew.
Method 2: Use 2 or more different field types
e.g. find n/Google n/Apple s/New, find n/Google n/Apple s/Applied s/New, find n/Google r/Engineer t/Python t/Java
- The
findcommand returns all internship entries that match with at least one value for every field type that is specified.
Detailed example:
- Figure 5 below shows InternBuddy starting with 5 internship entries. After entering
find n/Google n/Apple t/python t/java, the internships in green boxes were returned while those in red boxes were not.
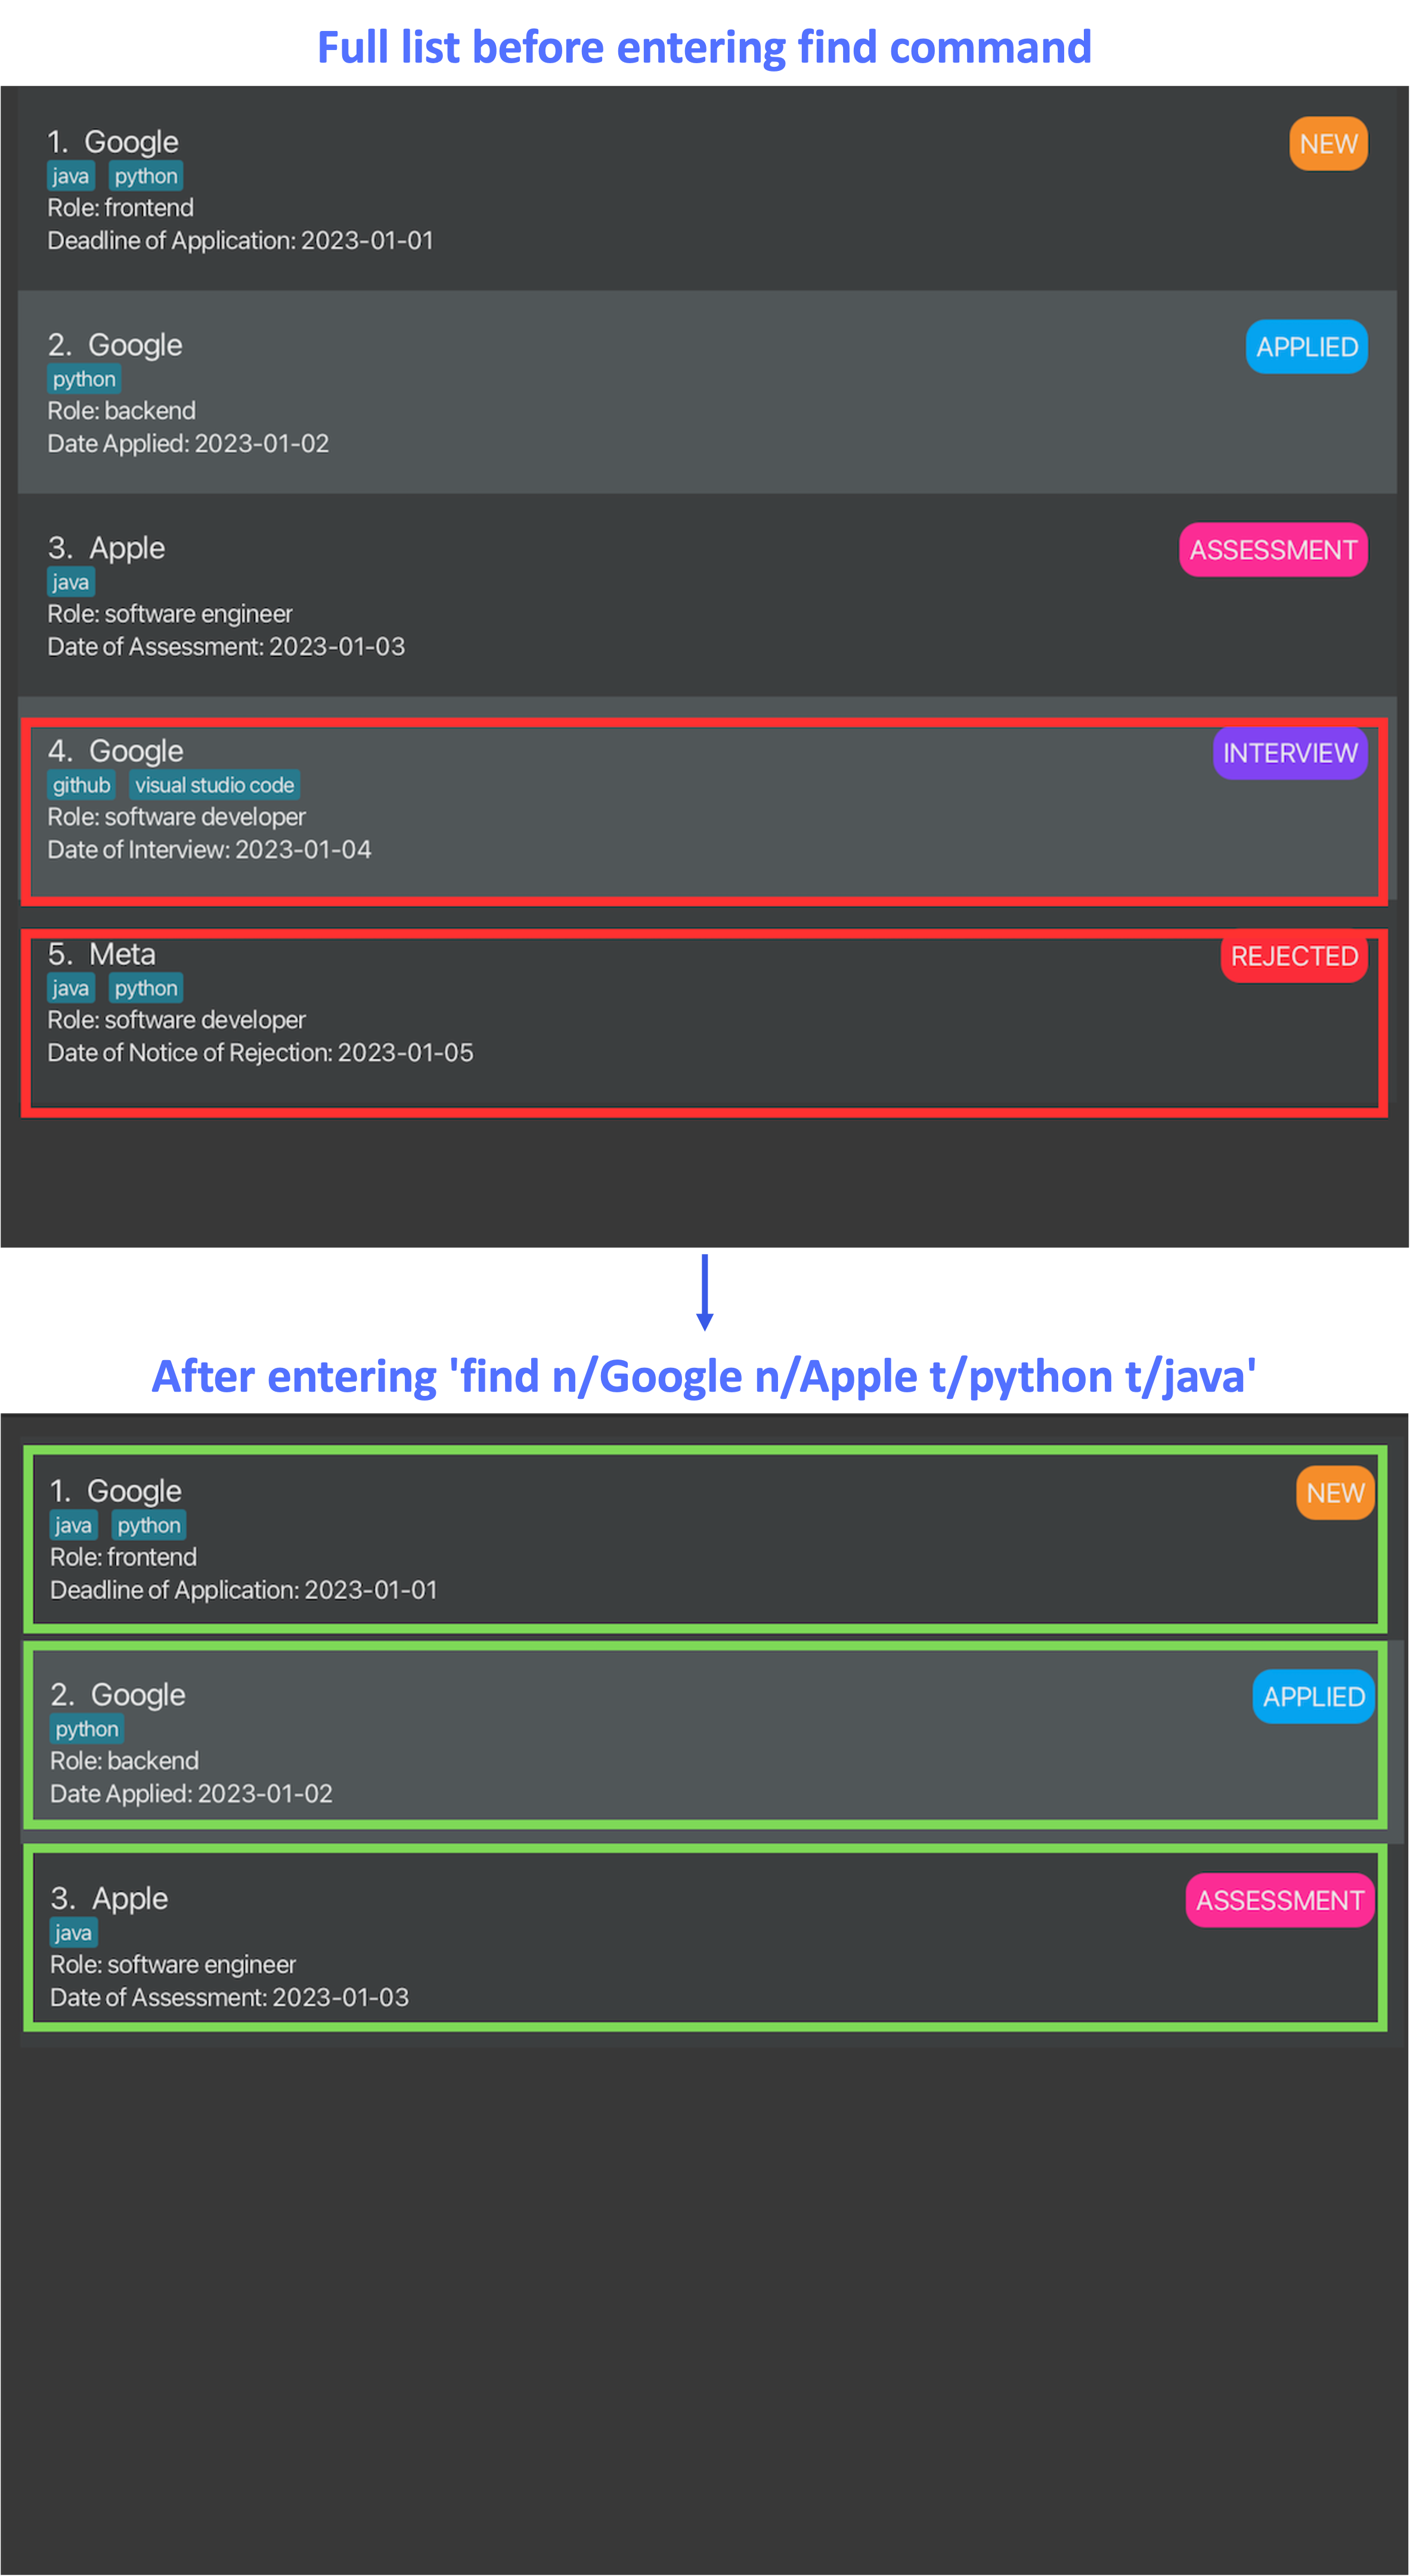
Figure 5: Example of the find command in action
- Table 7 explains the reasoning behind Figure 5.
| Index of Internship | Returned? | Explanation |
|---|---|---|
| 1 | Yes | It contains at least one company name Google and both tags python and java. |
| 2 | Yes | It contains at least one company name Google and at least one tag python. |
| 3 | Yes | It contains at least one company name Apple and at least one tag java. |
| 4 | No | It lacks both of the searched tags, python and java. |
| 5 | No | It lacks both of the searched company names, Google and Apple. |
Table 7: Explanation of Figure 5
More examples:
-
find n/Google n/Apple s/Interviewreturns internship entries that have a statusInterviewand have a company name ofGoogleorApple. -
find n/Google n/Apple s/Applied s/Interviewreturns internship entries that have company names ofGoogleorAppleand roles ofAppliedorInterview.
find command always searches through all of your internship entries
that are stored in InternBuddy. This means that it will also search through entries that are not currently displayed
in the List Panel.
Getting Upcoming Events and Deadlines : upcoming
Want to view your upcoming events and deadlines? You can do so using the upcoming command.
Format: upcoming
- The
upcomingcommand provides the list of internships that have events (interviews/assessments) or deadlines (application deadline/offer acceptance deadline) within the upcoming week. - In other words, it gives you the list of internships that have a
STATUSofNew/Offered/Assessment/Interviewand aDATEthat falls within the upcoming week. - Upcoming week is defined as the current day and the 6 days that follow it.
Examples:
-
upcomingIf today’s date is 5 January 2023, it will list all internships that have aSTATUSofNew/Offered/Assessment/Interviewand aDATEthat is from 5 January 2023 to 11 January 2023 inclusive.
Deleting Internships by Indices : delete-index
Need to keep your screen neat and tidy? delete-index can help you achieve this by deleting multiple internships using their indices.
Format: delete-index INDEX [INDEX]...
- Deletes the internship whose index number is
INDEX. - If multiple
INDEXare provided, multiple internships can be deleted. - At least 1
INDEXmust be provided. -
INDEXdoes not need to be unique. If 2 or more ofINDEXhave the same value, only the first one will be taken.
Examples:
- If you run
delete-index 1afterfind, it will delete the first entry as displayed byfindin the List Panel. - If you run
delete-index 1afterlist, it will delete the first entry as displayed bylistin the List Panel. -
delete-index 1 3Deletes the first and third internships in the List Panel. -
delete-index 3 1 3 3 1Deletes the first and third internships in the List Panel. -
delete-indexDisplays an error because at least oneINDEXmust be specified.
Deleting Internships by Fields : delete-field
Wish that you can delete internships using fields instead of indices? You can
certainly do so using delete-field.
Format: delete-field [n/COMPANY_NAME]... [r/ROLE]... [s/STATUS]... [d/DATE]... [t/TAG]...
- You have to provide at least one of the optional fields.
- The
delete-fieldcommand is case-insensitive. For example,delete-field n/Googledeletes all internships with company namesgoogle,GoogleorgOOgle. Also,delete-field t/javadeletes all internships with tagsJava,javaorJaVa. -
delete-fielddeletes entries with exact matches only. For example,delete-field n/Google Ltdwill not delete an entry with company nameGooglebecauseGoogledoes not exactly match withGoogle Ltd.
There are 2 possible ways for you to use the delete-field command.
Method 1: Use a single field type
e.g. delete-field s/Applied, delete-field s/Applied s/New,
delete-field n/Google n/Apple n/Meta
- The
delete-fieldcommand deletes all internship entries that match with any of the values that you provide.
More Examples:
-
delete-field s/Applied s/Newdeletes all internship entries that have a status of eitherAppliedorNew.
Method 2: Use 2 or more different field types
e.g. delete-field n/Google n/Apple s/New, delete-field n/Google n/Apple s/Applied s/New,
delete-field n/Google r/Engineer t/Python t/Java
- The
delete-fieldcommand deletes all internship entries that matches with at least one value for every field type that is specified.
More Examples:
-
delete-field n/Google n/Apple s/InterviewDeletes internship entries that have a statusInterviewand have a company name ofGoogleorApple. -
delete-field n/Google n/Apple s/New s/InterviewDeletes internship entries that have company names ofGoogleorAppleand roles ofNeworInterview.
delete-field command only searches through the internship entries
that are displayed in the List Panel. This means that it
will never delete entries that are not currently displayed in the
List Panel.
delete-field r/Engineer c/Good company will try to delete internships with a role
of Engineer c/Good company.
Clearing all Internships : clear
The clear command permanently deletes all entries from InternBuddy.
Format: clear
clear, you can refer to Appendix C
to repopulate InternBuddy with sample data.
Getting Help : help
Forgot the commands for InternBuddy? Fret not! You can easily view the list of supported commands and their formats
using the help command.
Format: help
- Opens a new window which displays the list of supported commands in InternBuddy, and provides a link to InternBuddy’s user guide where you can view more detailed information about each command. Figure 6 shows how the Help Window looks like.
- You can click on the button to copy the link to your clipboard.

Figure 6: Help Window
Exiting InternBuddy : exit
Done with tracking your internships for the day? Exit InternBuddy using the exit command.
Format: exit
Navigating through Past Commands
Want to reuse a command you entered just now but too lazy to type it all out again? InternBuddy has got your back! After clicking on the Command Box, pressing and will fill the Command Box with commands that you have recently entered. This allows you to effortlessly access and use past commands without having to go through the tedious process of typing them all over again.
Example:
- Figure 7 illustrates how you can navigate through past commands where the inputs
list,clearandupcomingare entered in this particular order. The and keys are used to navigate between the different inputs.

Figure 7: Navigating between commands
Saving your Internship Data
Your internship data for InternBuddy are saved automatically after any command that changes the data. The data are saved
in a file internbuddy.json which is located in a subfolder data in the home folder
where you placed internbuddy.json. There is no need to save manually.
Loading the Data
InternBuddy data is loaded from internbuddy.json automatically at the beginning of each run. There is no need to load
manually.
- If
internbuddy.jsonis missing, InternBuddy will start with a new data file containing the sample internship entries. - If the content in
internbuddy.jsonwas altered and as a result has an invalid format, InternBuddy will start with an empty data file.
internbuddy.json unless you are confident in doing so. If you are interested, you can refer to
Appendix B for instructions on how to do so.
FAQ
Q: How do I transfer my data to another Computer?
A: Install InternBuddy in the other computer and overwrite the file internbuddy.json that it creates with the
file internbuddy.json that is stored on your existing computer.
Q: Does InternBuddy support undoing of commands? For example, can I undo a delete-index action?
A: Unfortunately, the current version of InternBuddy does not support the undo command. However, it is a feature
that we are exploring and hope to implement in the future!
Command Summary
Table 8 provides an overview of the commands supported in InternBuddy.
| Action | Format, Examples |
|---|---|
| List all Internships | list |
| Add an Internship |
add n/COMPANY_NAME r/ROLE s/STATUS d/DATE [c/COMMENT] [t/TAG]... e.g. add n/Apple r/Software Engineer s/New d/2023-03-01
|
| Edit an Internship |
edit INDEX [n/COMPANY_NAME] [r/ROLE] [s/STATUS] [d/DATE] [c/COMMENT] [t/TAG]...e.g. edit 2 s/Assessment r/Software Developer
|
| View an Internship |
view INDEXe.g. view 1
|
| Copy an Internship to Clipboard |
copy INDEXe.g. copy 1
|
| Find Internships |
find [n/COMPANY_NAME]... [r/ROLE]... [s/STATUS]... [d/DATE]... [t/TAG]...e.g. find n/Apple n/Google
|
| Get Upcoming Events/Deadlines | upcoming |
| Delete Internships by Indices |
delete-index INDEX [INDEX]...e.g. delete-index 1 3
|
| Delete Internships by Fields |
delete-field [n/COMPANY_NAME]... [r/ROLE]... [s/STATUS]... [d/DATE]... [t/TAG]...e.g. delete-field n/Apple n/Google s/New s/Applied
|
| Clear all Internships | clear |
| Get Help | help |
| Exit InternBuddy | exit |
Table 8: Commands in InternBuddy
Appendix A: Installing Java 11
Follow the following steps to set up Java 11 on your computer.
- Open up a terminal on your computer.
- If you are using Windows, click on the
Windowsicon at the bottom left of your computer. Then, type interminalin the search bar and double-click the application calledTerminal. - If you are using macOS, click on the
Spotlightsearch icon at the top right of your computer. Then, type interminalin the search bar and double-click the application calledTerminal. - If you are using Linux, press + + to launch the terminal.
- If you are using Windows, click on the
- In the terminal, type in
java -versionand press . The terminal will display the version of Java that you have installed on your computer. - If you do not have any versions of Java installed, or you have a version older than Java 11, download Java 11 here. You may then return to Step 1 to check whether you have the correct version of Java installed.
Appendix B: Customising the Data File
If you are an advanced user of InternBuddy, you can directly edit the contents of your data through the internbuddy.json
file without using the GUI. The internbuddy.json file is found in the data subfolder of your InternBuddy
home folder.
internbuddy.json file. This is because if you accidentally make a mistake that leads to the JSON
file not having the correct format, InternBuddy would restart with the sample data file, wiping out any data that you had
previously.
The following steps outline how you can properly edit the internbuddy.json file:
- Open the
internbuddy.jsonfile by double-clicking on it. If you are prompted to select an application to open the file, you can choose any text editor such asNotepad. - Once opened, you will see the JSON data file in a format as shown in Figure 8. Referring to Figure 8, each box contains the data for one specific internship entry.
- Within each box, you can see that there are pairings where each pair is made up of a
FIELDandVALUE.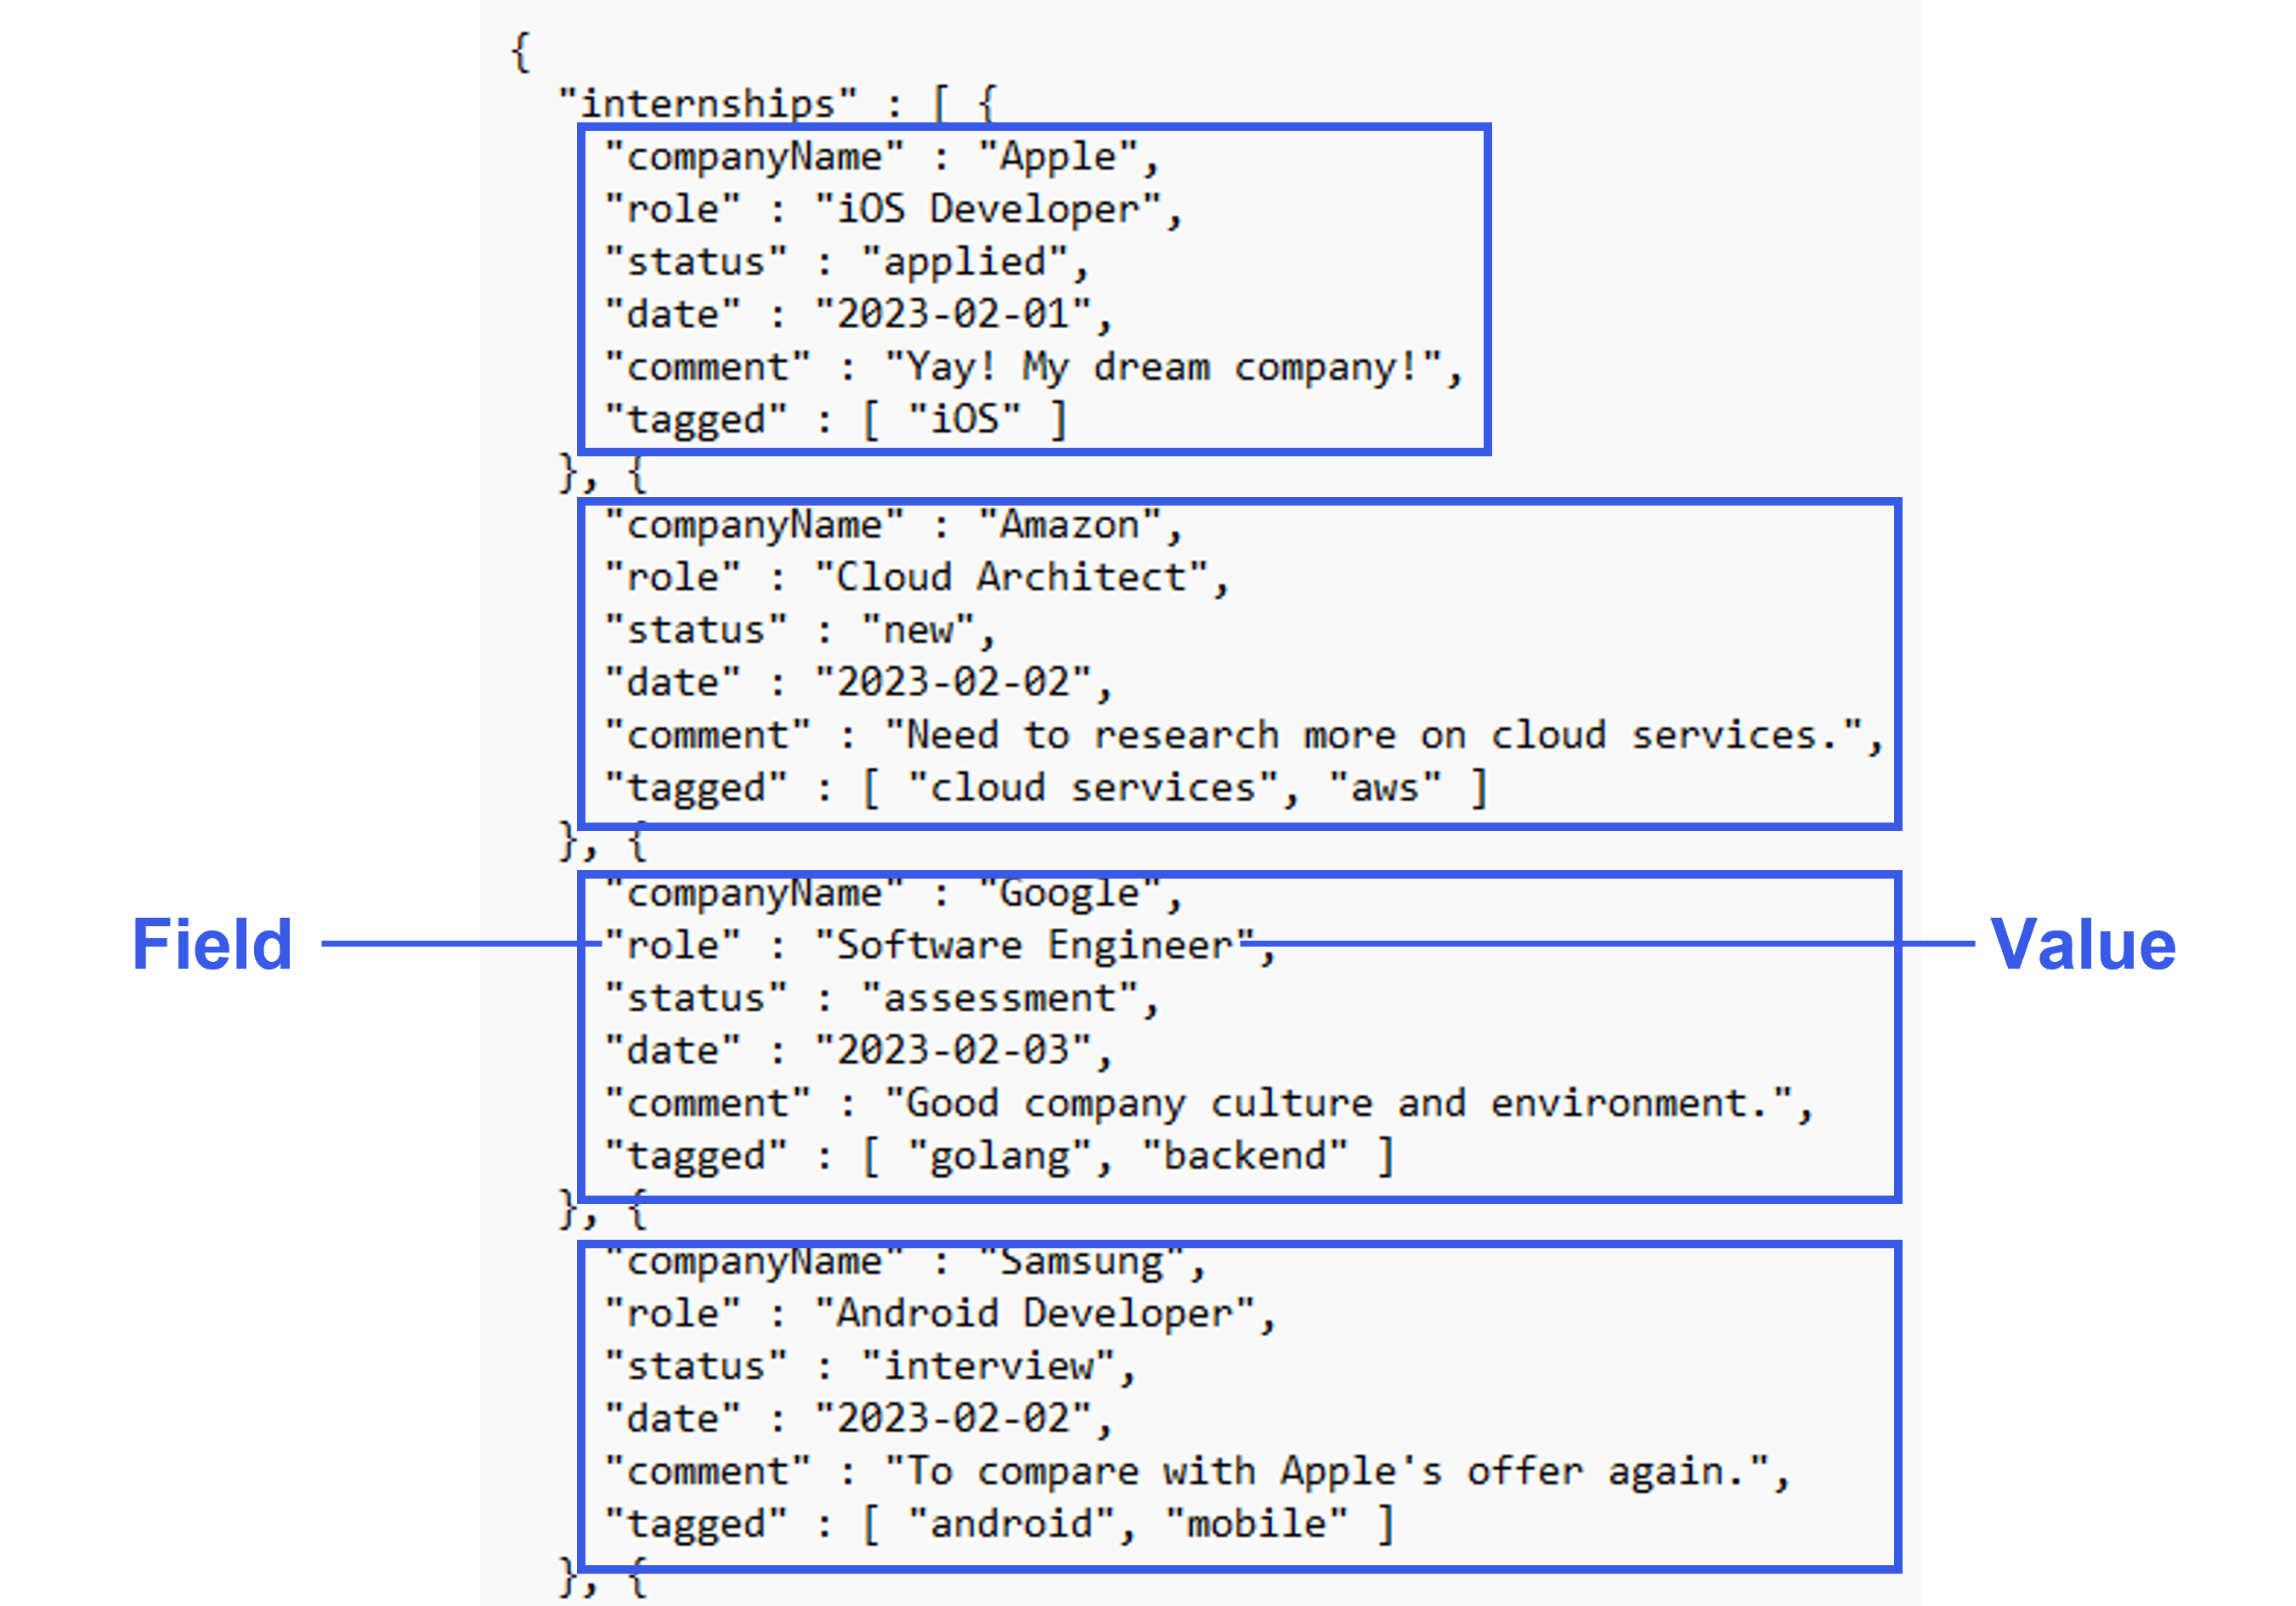
Figure 8: Sample JSON data file
- To manually change the value of a field, simply replace the text for
VALUE. Figure 9 illustrates an example where we change the value ofSTATUSfromassessmenttointerviewfor the internship entry with company nameGoogle. Once your changes have been made, you can save the file by pressing + .
 Warning: Make sure that you follow the constraints
when substituting in your own values. If the constraints are not satisfied, InternBuddy will not be able to
read your data in the
Warning: Make sure that you follow the constraints
when substituting in your own values. If the constraints are not satisfied, InternBuddy will not be able to
read your data in the internbuddy.jsonfile and will restart with all your internship data cleared.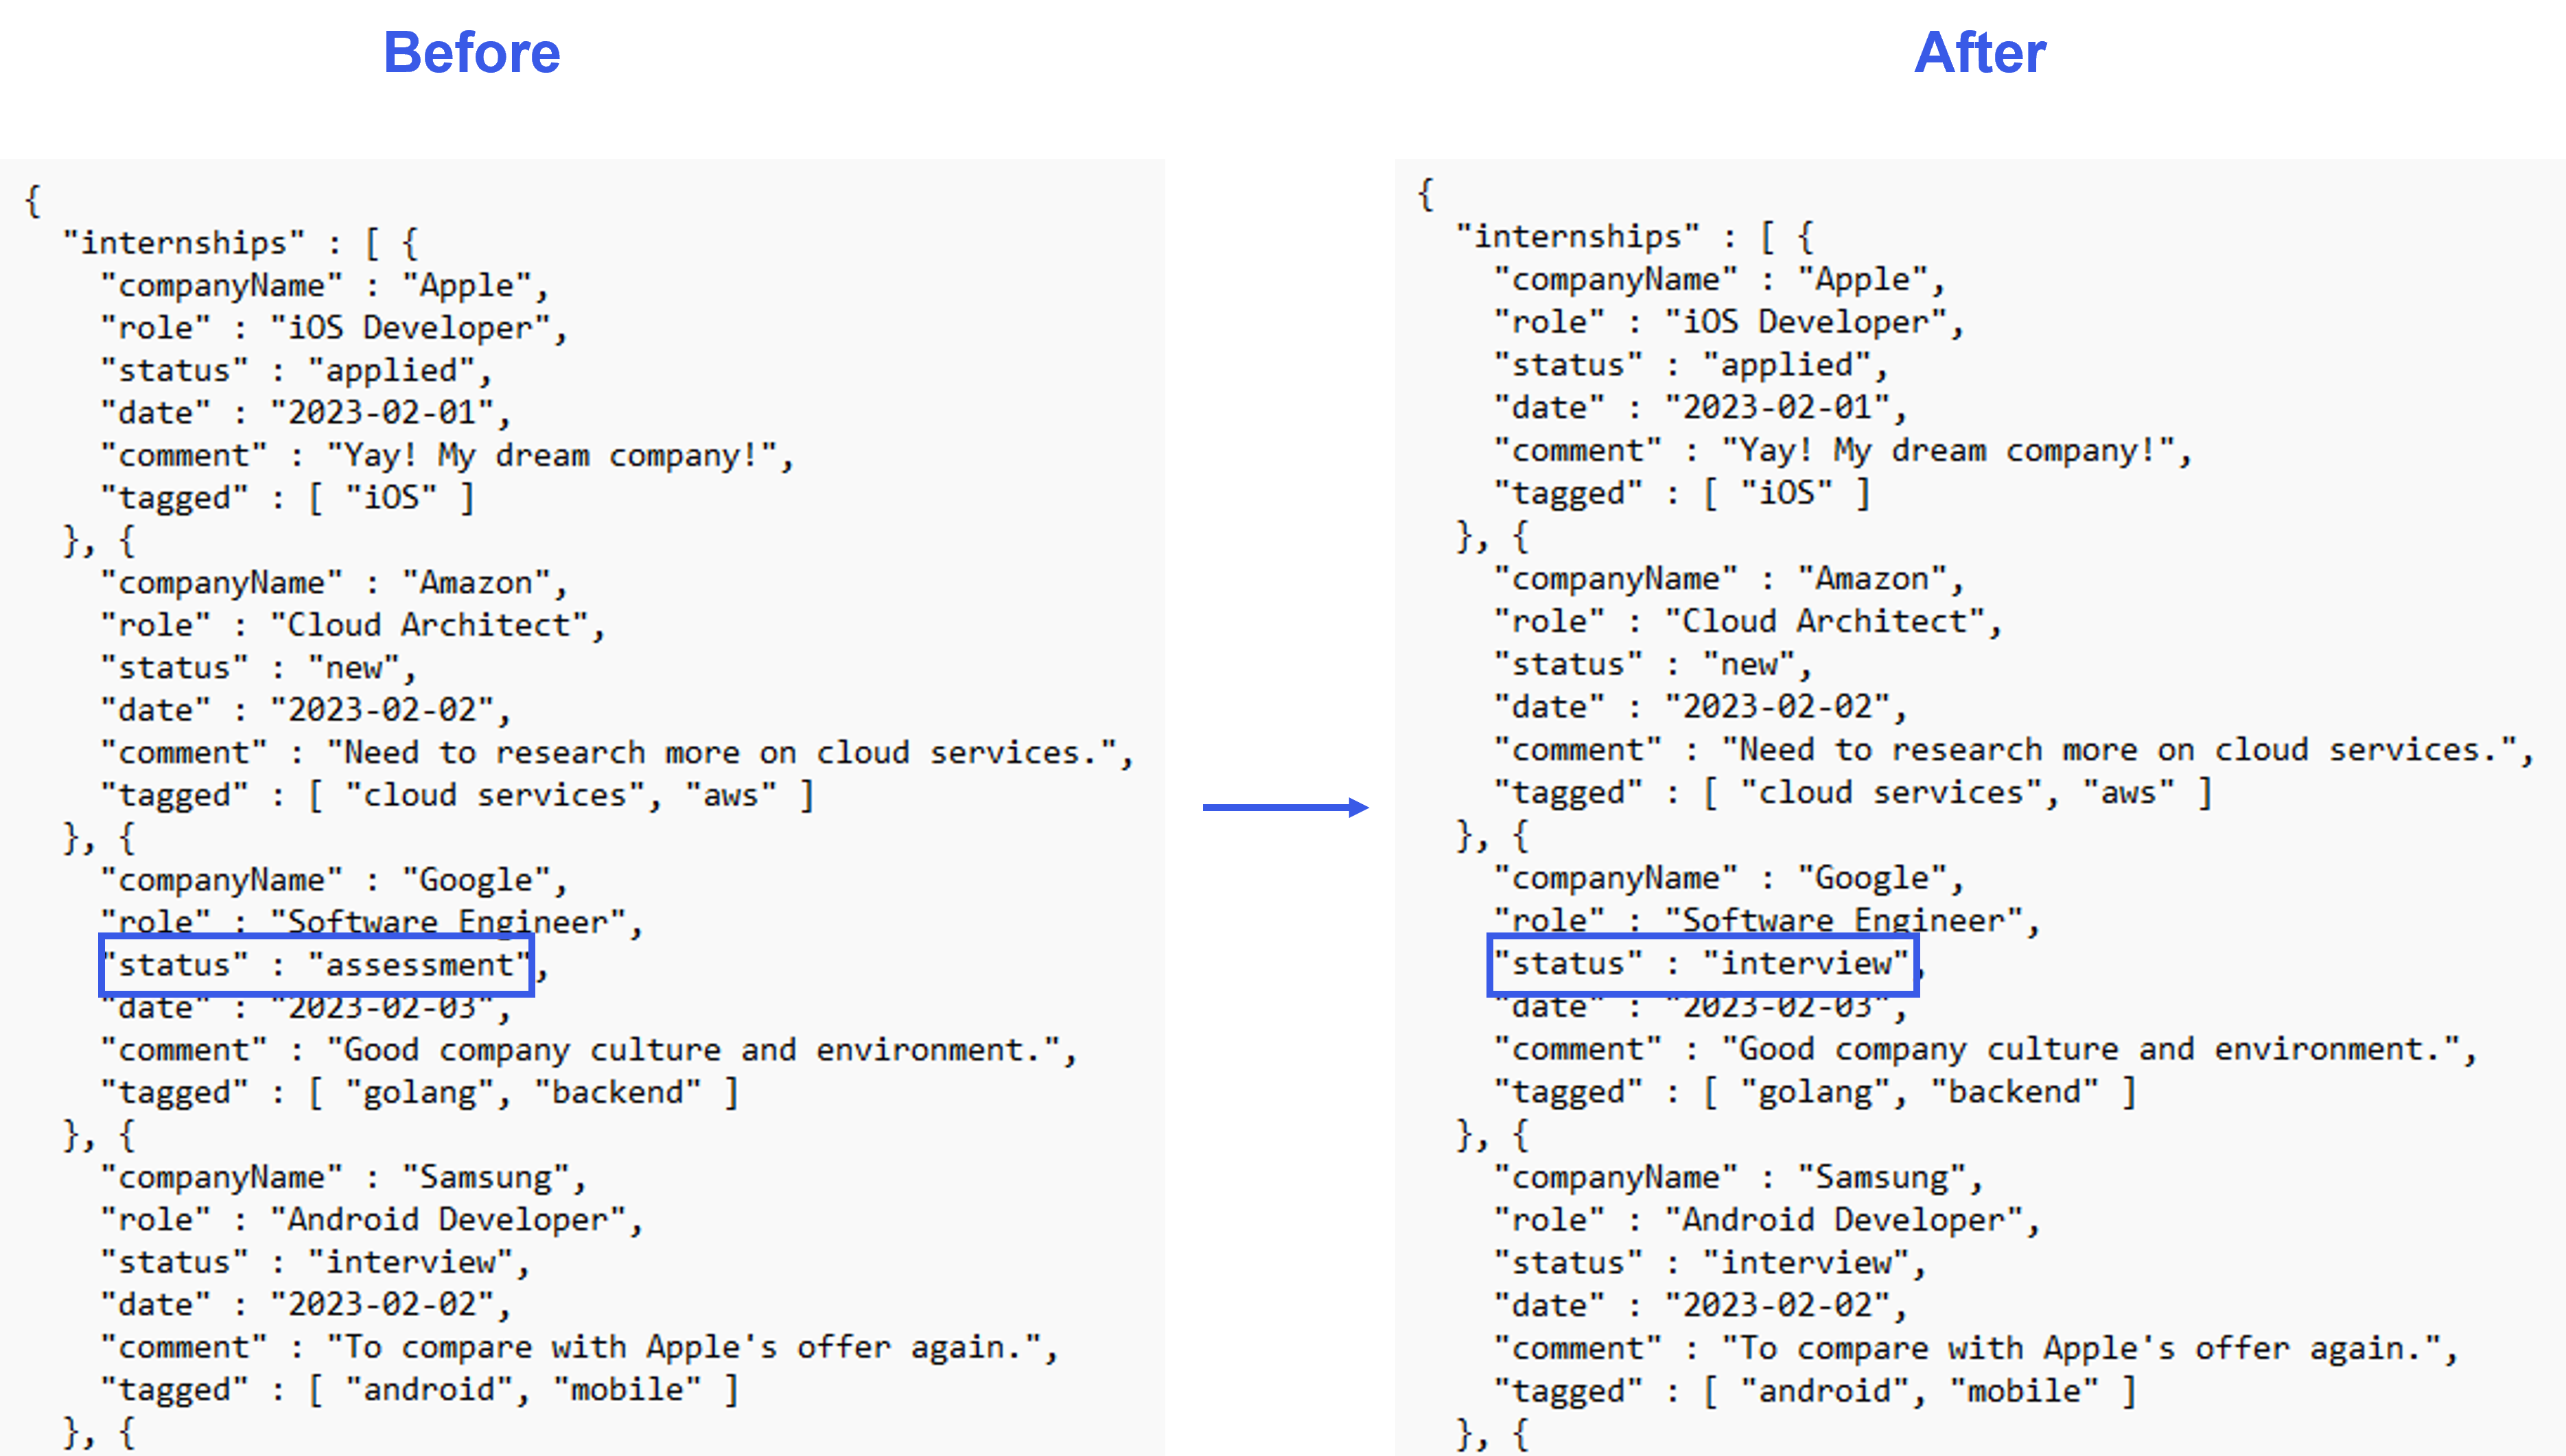
Figure 9: Editing the JSON file
- Launch InternBuddy and you will see that your data have been updated accordingly.
Appendix C: Populating InternBuddy with Sample Data
Follow the following steps to populate InternBuddy with sample data.
- Visit this link.
-
Left-click the button labelled
Raw. Figure 10 shows where theRawbutton is.
Figure 10: Raw button on the GitHub interface
- Your screen will look like Figure 11. Right click, then click on
Save As.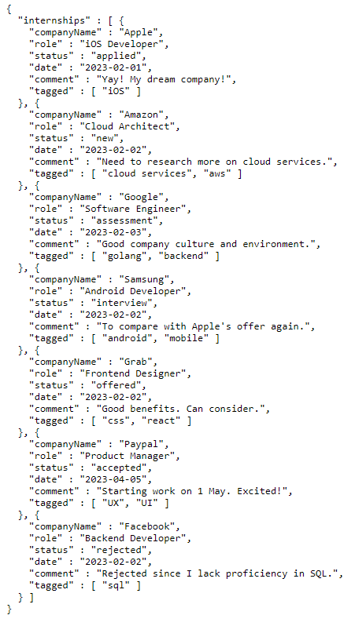
Figure 11: InternBuddy Sample Data
- You will be prompted to choose a folder to save the file in. Choose the
datasubfolder that is found in the home folder that you have chosen for InternBuddy. - Click
Save.
Warning: If you already have an internbuddy.json file in the subfolder, you will be prompted to
confirm whether you want to overwrite it when attempting to populate InternBuddy with sample data.
It is important to only choose to overwrite the existing file if you are absolutely certain that you
do not need your old InternBuddy data anymore. If you are unsure, you can always make a backup copy
of the file before overwriting.
- You are done! InternBuddy will be populated with the sample data the next time you launch it.
Glossary
Table 9 provides a glossary for the technical terms used in this user guide.
| Term | Definition |
|---|---|
| Command | An instruction for InternBuddy to perform an action. |
| Command Line Interface (CLI) | A CLI is the text-based interface that you can use to provide instructions to your computer. Examples of instructions include opening files and running programs. |
| Graphical User Interface (GUI) | A GUI is the visual interface that you see when an application launches, allowing you to interact with it by clicking on its various buttons and components. |
| Mainstream Operating Systems | Include Windows, macOS, Linux and Unix. |
| Field | A part of the command where you have to supply a value for the command to be valid. |
| Prefix | A short form for the name of a field. It indicates which field does a value belongs to. For example, in n/Apple, the value Apple is supplied to the field COMPANY_NAME since the n/ prefix is used. |
Table 9: Glossary for InternBuddy's User Guide
Acknowledgements
- InternBuddy is written in Java 11.
- It is adapted from the AddressBook Level 3 project created by the SE-EDU initiative.
- Libraries and frameworks used: JavaFX, Jackson, JUnit5 and TestFX.
- GUI testing is implemented with references from AddressBook Level 4 and Please Hire Us. We utilised code from these projects to set up GUI testing and added our own test cases to test the UI components that we created.
- The feature of Navigating Through Past Commands is primarily adapted from HackNet, but we added code modifications and test cases.
- The sections on explaining the formatting standards and GUI interface in the User and Developer Guides are inspired by Please Hire Us.